Messaging API client for Viber
npm i --save messaging-api-viberor
yarn add messaging-api-viberconst { ViberClient } = require('messaging-api-viber');
// get authToken from the "edit info" screen of your Public Account.
const client = new ViberClient({
accessToken: authToken,
sender: {
name: 'Sender',
},
});messaging-api-viber uses axios as HTTP client. We use axios-error package to wrap API error instances for better formatting error messages. Directly calling console.log with the error instance will return formatted message. If you'd like to get the axios request, response, or config, you can still get them via those keys on the error instance.
client.setWebhook(url).catch((error) => {
  console.log(error); // formatted error message
  console.log(error.stack); // error stack trace
  console.log(error.config); // axios request config
  console.log(error.request); // HTTP request
  console.log(error.response); // HTTP response
});All methods return a Promise.
- sendMessage
- sendText
- sendPicture
- sendVideo
- sendFile
- sendContact
- sendLocation
- sendURL
- sendSticker
- sendCarouselContent
Keyboards - Official Docs
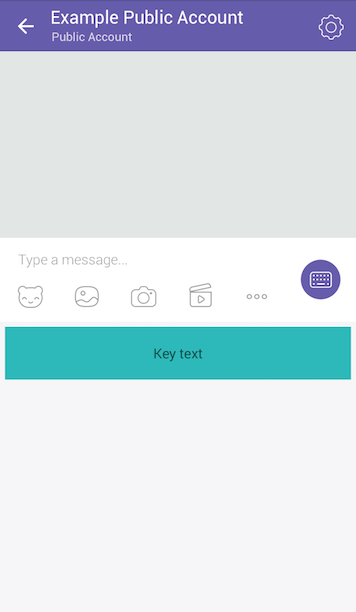
The Viber API allows sending a custom keyboard using the send_message API, to supply the user with a set of predefined replies or actions. Keyboards can be attached to any message type and be sent and displayed together. To attach a keyboard to a message simply add the keyboard’s parameters to the options:
client.sendText(USER_ID, 'Hello', {
  keyboard: {
    type: 'keyboard',
    defaultHeight: true,
    bgColor: '#FFFFFF',
    buttons: [
      {
        columns: 6,
        rows: 1,
        bgColor: '#2db9b9',
        bgMediaType: 'gif',
        bgMedia: 'http://www.url.by/test.gif',
        bgLoop: true,
        actionType: 'open-url',
        actionBody: 'www.tut.by',
        image: 'www.tut.by/img.jpg',
        text: 'Key text',
        textVAlign: 'middle',
        textHAlign: 'center',
        textOpacity: 60,
        textSize: 'regular',
      },
    ],
  },
});
Broadcast API - Official Docs
Those API methods use the same parameters as the send methods with a few variations described below. You should specify a list of receivers instead of a single receiver.
- broadcastMessage
- broadcastText
- broadcastPicture
- broadcastVideo
- broadcastFile
- broadcastContact
- broadcastLocation
- broadcastURL
- broadcastSticker
- broadcastCarouselContent
| Param | Type | Description |
|---|---|---|
| broadcastList | Array<String> |
This mandatory parameter defines the recipients for the message. Every user must be subscribed and have a valid user id. The maximum list length is 300 receivers. |
Example:
await client.broadcastText(
  [
    'pttm25kSGUo1919sBORWyA==',
    '2yBSIsbzs7sSrh4oLm2hdQ==',
    'EGAZ3SZRi6zW1D0uNYhQHg==',
    'kBQYX9LrGyF5mm8JTxdmpw==',
  ],
  'a broadcast to everybody'
);
// {
//   messageToken: 40808912438712,
//   status: 0,
//   statusMessage: 'ok',
//   failedList: [
//     {
//       receiver: 'pttm25kSGUo1919sBORWyA==',
//       status: 6,
//       statusMessage: 'Not subscribed',
//     },
//     {
//       receiver: 'EGAZ3SZRi6zW1D0uNYhQHg==',
//       status: 5,
//       statusMessage: 'Not found',
//     },
//   ],
// }To enable default request debugger, use following DEBUG env variable:
DEBUG=messaging-api:requestIf you want to use a custom request logging function, just provide your own onRequest:
const client = new ViberClient({
  accessToken: ACCESS_TOKEN,
  onRequest: ({ method, url, headers, body }) => {
    /* */
  },
});To avoid sending requests to real Viber server, specify the origin option when constructing your client:
const { ViberClient } = require('messaging-api-viber');

const client = new ViberClient({
  accessToken: ACCESS_TOKEN,
  origin: 'https://mydummytestserver.com',
});
Warning: Don't do this on your production server.

