-
Notifications
You must be signed in to change notification settings - Fork 0
Tables
The table interface allows a user to place text data in tabular form. This is a rich interface with multiple options to give the user control over the presentation of the contents in the table all the way down to individual cells. The simplest call to table requires and x,y coordinate position and an array of objects holding the contents to be put into table form. Each object in the contents array represents a row of data to be placed in the table. The object properties represent one of the columns in the table. The order of the columns is determined by the order of the properties in the first element of the array.
The example below is going to use an array of objects with the properties: name, address, city, state, job.
const HummusRecipe = require('hummus-recipe');
const recipe = new HummusRecipe('new', 'simpleTable.pdf');

const contents = [{
    name: "Steven Haehn",
    address: "257 Banana Ave.",
    city: "Colorado Springs",
    state: "Colorado",
    job: "computer programmer"
    }, ...     // Not all shown here for simplicity.
];

recipe
    .createPage('letter')
    .table(50, 52, contents)
    .endPage()
    .endPDF();
As can be seen, the text is put into columnar form without a header, and it lacks cell or border lines. The column order follows that of the first contents record property keys. Note that data in columns can be missing as can be seen in row 5, column 3, but since record one is used to determine what columns are to be produced, it better have all the properties it needs to produce the desired set of columns. The default column width for all the columns is 100 points.
To envision the formatted text to look more like a table, borders can be applied. The simplest form of the border option is to set its value to the boolean true.
const HummusRecipe = require('hummus-recipe');
const recipe = new HummusRecipe('new', 'simpleTable.pdf');

const contents = [{
    }, ...     // Not all shown here for simplicity.
];

recipe
    .createPage('letter')
    .table(50, 52, contents, {border:true})
    .endPage()
    .endPDF();
It can also be an object with properties that can change the line thickness, or color of the line as shown below.
const HummusRecipe = require('hummus-recipe');
const recipe = new HummusRecipe('new', 'simpleTable.pdf');

const contents = [{
    }, ...     // Not all shown here for simplicity.
];

recipe
    .createPage('letter')
    .table(50, 52, contents, {border:{stroke:'#000000', width:1}})
    .endPage()
    .endPDF();
To produce a header for the table, use the header option. Its value can be as simple as a boolean true, or a complicated object which honors all the text interface options. (Now don't get carried away here, the rotation option will certainly be honored, but all that will happen is that the cell will get rotated and the results won't be pretty). Note what happens when header is set to true. The names of the object record properties become the column titles, in bold, and centered. (The border is included to enhance the visual presentation)
const HummusRecipe = require('hummus-recipe');
const recipe = new HummusRecipe('new', 'simpleTable.pdf');

const contents = [{
    name: "Steven Haehn",
    address: "257 Banana Ave.",
    city: "Colorado Springs",
    state: "Colorado",
    job: "computer programmer"
    }, ...     // Not all shown here for simplicity.
];

recipe
    .createPage('letter')
    .table(50, 52, contents, {header:true, border:true})
    .endPage()
    .endPDF();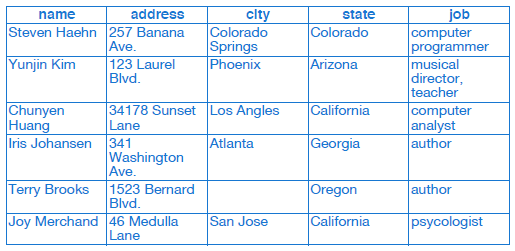
Now let's change the header option into an object with cell defining attributes. In the example below, each header cell will get some padding, have its text aligned to the left and change the cell text color. (Think of the cell option as an alternate name for the text interface's textBox option.)
const HummusRecipe = require('hummus-recipe');
const recipe = new HummusRecipe('new', 'simpleTable.pdf');

const contents = [{
    }, ...     // Not all shown here for simplicity.
];

recipe
    .createPage('letter')
    .table(50, 52, contents, {
        border: true,
        header:{
            color:'red',
            cell:{padding:[8,2,8,2], textAlign:'left'}}})
    .endPage()
    .endPDF();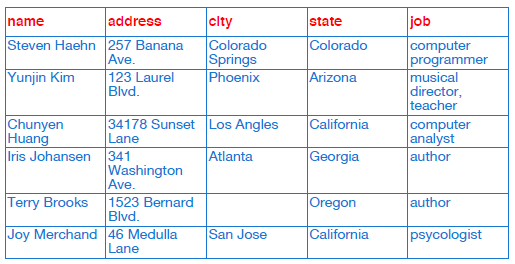
There is on more header option called alignToColumn which is discussed below in the Column Customization section.
The row option gives the user the ability to specify text properties that can be applied to all the cells in a table row. Its 2 important properties are cell and nth. The cell property is used to apply text properties to the individual rows, the same as the cell property used in the header option. The nth option can take on 2 values; 'even' or 'odd'. When the nth is used, then the row cell properties are only applied to the even rows or the odd rows, dependent on the value of nth.
So now to make the example table a little more sophisticated, let's add a background color to every odd row in the table.
const HummusRecipe = require('hummus-recipe');
const recipe = new HummusRecipe('new', 'simpleTable.pdf');

const contents = [{
    }, ...     // Not all shown here for simplicity.
];

recipe
    .createPage('letter')
    .chroma('gray', "#dddddd")
    .table(50, 52, contents, {
        header: {cell:{padding:[8,2,8,2], textAlign:'left'}},
        border: {stroke:'gray'},
        row: {nth:'odd', cell:{style:{fill:'gray'}}})
    .endPage()
    .endPDF();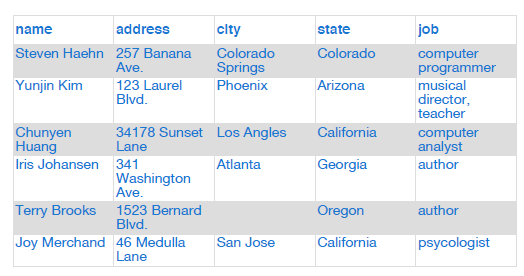
Now its time to start moving away from the simple defaults of the table interface to get more control over the resulting format. The first option to help with this is called columns. The columns option points to an array of objects which describe the attributes that are to be applied to an individual table column. These attributes are as follows:
- name - supply the name of the associated content data field (mandatory).
- text - is the text for the title to be applied to the column header (when header is exposed)
- width - the width of the table column
- cell - holds all the options that can be applied to a column table cell
- hcell - holds all the options that can be used to override general header cell options
- color - text color used in the column
- opacity - column text opacity
- font - column font
- size - column font size
- renderer - call back function for individual cell rendering
Now we take our previous table example and add a columns option.
const HummusRecipe = require('hummus-recipe');
const recipe = new HummusRecipe('new', 'customTable.pdf');

const contents = [{
    }, ...     // Not all shown here for simplicity.
];

const columns = [

    //      Column          Associated     Other
    //      Title           Data Field     Attributes

    { text: "Name",       name: "name",    width: 110 },
    { text: "Address",    name: "address", width: 130 },
    { text: "City/Town",  name: "city",    width: 100 },
    { text: "State",      name: "state",   width: 80  },
    { text: "Occupation", name: "job",     width: 100, color: 'red', size: 10 }
];

recipe
    .createPage('letter')
    .chroma('gray', "#dddddd")
    .table(50, 52, contents, {
        columns: columns,    // customizes columns of table
        header: {cell:{padding:[8,2,8,2], textAlign:'left'}},
        border: {stroke:'gray'},
        row: {nth:'odd', cell:{style:{fill:'gray'}}})
    .endPage()
    .endPDF();
It is possible to set up each column with its own text alignment using the cell option. If you desire to have the header text of the column to mimic the same alignment as the column data, set the header boolean option called alignToData to true to force that behavior. (If there is no explicit column alignment given, the alignment for the header cell will default to what is supplied by the header option.) Note, the hcell option is the final arbiter of deciding what options should be applied to the column's header cell.
The most interesting columns option in the bunch is renderer. It allows the user to customize individual cells in the column. The value of renderer is a function which will be called with the arguments (text, data, columnId, row), where text is the actual cell string value, data holds the row object data, columnId is the name of the column, and row is the current row number. By passing the row data and cell identification information into the function, the user can choose to alter the characteristics of the cell based these values. Note that any characteristic that changes the text measurements may push the text outside of the cell. (Currently, cell dimensions are computed prior to rendering using the original text characteristics of the text in the cell)
In the following example, data is read from a genealogy file containing the first name, last name, and gender of the individual. The intent of the program is to place a sorted list of names of the people into a table and visually identify the males from the females.
const fs = require('fs');
const HummusRecipe = require('hummus-recipe');

function compare(a, b) {
    // Use toUpperCase() to ignore character casing
    const nameA = a.last_name.toUpperCase();
    const nameB = b.last_name.toUpperCase();

    let comparison = 0;
    if (nameA > nameB) {
      comparison = 1;
    } else if (nameA < nameB) {
      comparison = -1;
    }
    return comparison;
}

function hilight (text, record, row) {
    if (record.gender.toLowerCase() === 'female') {
        return {color:'#ff1493'}
    }
}

const recipe = new HummusRecipe('new', 'table-render.pdf');
const peeps  = fs.readFileSync('people.json', 'utf8');
const people = JSON.parse(peeps);

const columns = [
    { name: "first_name", width: 80, renderer: hilight },
    { name: "last_name",  width: 80, renderer: hilight }
];

recipe
    .createPage('letter')
    .table(50, 52, people.sort(compare), {
        columns: columns,
        border:true,
        header:{cell:{textAlign:'left'}},
        row:{size:10}
    })
    .endPage()
    .endPDF();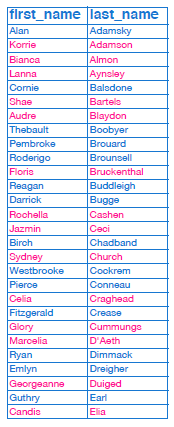
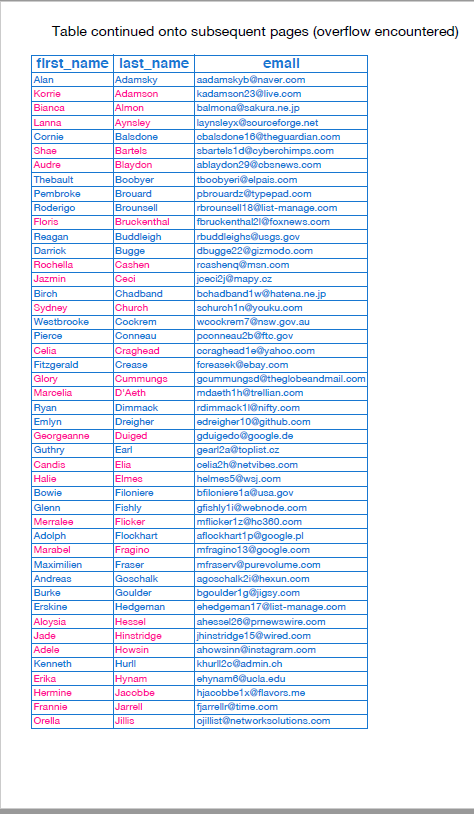
As mentioned earlier, the ordering of the text columns in the table is automatically determined by the order of the object properties of the first data record. Another way to determine column ordering is with the order option. Not only can column ordering be handled, the actual columns to display can also be controlled. Say there are 10 fields in the record data, but only 3 of them are desired to create the table, then simply specify only those fields in the order option. The fields may be specified as names in a comma separated string, or as an array of field names. The first field in the list of names represents the first column in the table. See example below in Table Overflow section.
When there is tons of data to put into a table, there is likely going to be too much that an individual table can hold and consequently a need for handling the data overflow. Thus, the reason for the overflow option. The value of this option is a function to deal with the occurrence of the overflow. The user has the choice of halting the table filling process, choose a new place to continue the table on the current page, or to place the table on another page altogether. The overflow handler is called with (self, row) where self is the recipe handle and row is the row number at which the data would exceed the capacity of the table. To halt table filling operations the return value of the function should be set to the boolean true. To position the table at another spot, either on the current page, or the next page, the return value should be an object specifying a 'position' property with an array value constituting the x,y coordinates of the new table position. See the following example.
const fs = require('fs');
const HummusRecipe = require('hummus-recipe');

function compare(a, b) { }        // see previous example
function hilight (text, record, row) { }

const recipe = new HummusRecipe('new', 'table-overflow.pdf');
const peeps  = fs.readFileSync('people.json', 'utf8');
const people = JSON.parse(peeps);

const columns = [
    { name: "first_name", width: 80, renderer: hilight },
    { name: "last_name",  width: 80, renderer: hilight }
];

const newPage = (self, row) => {
    self.endPage();
    self.createPage('letter');
    return {position: [30,52]};
};

let nextTable = 30;
const samePage = (self, row) => {
    nextTable += 170;
    if (nextTable > 500) {
        return true;
    }
    return {position: [nextTable,302]};
};

let x = 50;
let y = 52;
recipe
    .createPage('letter')
    .chroma('black', '#000000');
    .text('Tables showing new position when "overflow" encountered.',
       80, y+200, {color:'black'})
    .text('Note data driven property (color) assignment',
       130, y+220, {size:12, color:'black'} )

    .table(x-20, y+250, people.sort(compare), {
        columns: columns,
        border:true,
        header:{cell:{textAlign:'left'}},
        row:{size:10},
        overflow: samePage,
        order: "first_name,last_name"
    })
    .endPage()
    .createPage('letter')
    .text('Table continued onto subsequent pages (overflow encountered)',
       x,y-30, {color:'black'})

    .table(x-20, y, people.sort(compare), {
        columns: columns,
        border:true,
        header:true,
        row:{size:10},
        overflow: newPage,
        order: "first_name,last_name,email"
    })
    .endPage()
    .endPDF();
