-
Notifications
You must be signed in to change notification settings - Fork 0
Tutorial 6: Using the Robot Manager
The TeMoto Robot Manager (TRM) maintains information about robotic manipulators, grippers, and mobile bases and can dynamically provide access to all drivers comprising a single robot through a unified interface, i.e., Robot Manager Interface. A single device or an assembly of robotic devices compose a robot resource.
Robot Manager utilizes ROS MoveIt and ROS Navigation for manipulation and navigation related functionalities accordingly, and it is currently strictly limited to 4 basic behaviors:
- EEF pose movement via following a planned trajectory
- Move a particular planning group to a pre defined namedTargetPose
- Mobile base movement via ROS navigation
- Gripper opening and closing via custom interfaces
Each of these behaviors are strictly associated with a driver, which starts up the hardware component, and a controller, which provides access to the hardware.
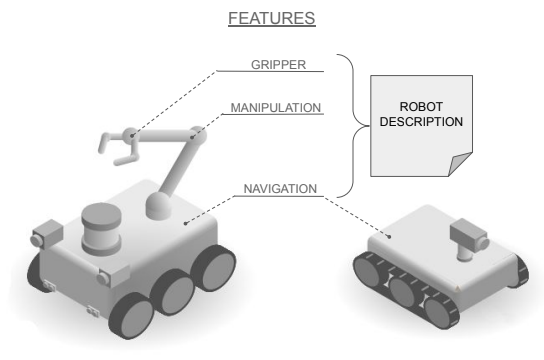
TRM was designed to integrate the control of the main robotic components and provide the application developer a unified structure for controlling a robot as a whole unit rather than controlling each feature separately. In order to let TRM know the capabilities of a robot, they need to be listed in a robot description file. For instance, a mobila base will contain just navigation feature whereas a mobile manipulator will have a manipulation, navigation and gripper feature listed on the robot description. Note that in case of a multi-robot system, it is required to include a robot definition with different robot_name for each robot, even if the hardware is the same (in the case of homogeneous MRS).

Figure 1: Robot features described in a robot description yaml file.
All of the information related to the robots, are outlined in a robot description YAML file that, at the user's disposal, can be stored together with the respective ROS package of the robot (one file for each robot), or into a single file with the description of various robots. Each robot must have a unique robot_name key, thus TeMoto can identify them within the system.
The robot description describes all elements of the robot and provides TRM the necessary information to know how to access each resource.
"Manipulation feature"
TRM makes use of the MoveIt! package for controlling manipulators, hence the controller in the robot description YAML outlines the settings for the move_group node.
"Navigation feature"
Contain the executables and parameters that are in charge of setting up the move_base node.
"Gripper feature"
TeMoto requires an intermediate node between TRM and the gripper hardware, which acts as a converter node or translator between different types of service definitions. This node is in charge of creating a temoto_gripper_control Server to receive commands, adjust the values received from the TeMoto definition to the custom value for the gripper, and then sends the adjusted command to the gripper control interface.
Example of robot_description for a dual arm mobile manipulator
Robots:
- robot_name: "dual_arm_robot"
  description: "Dual arm simulation"
  reliability: 0.8
  urdf:
    package_name: "dual_arm_robot_description"
    executable: "urdf/dual_arm_robot.urdf.xacro"
  navigation:
    controller:
      package_name: "dual_arm_robot_config"
      executable: "dual_arm_robot_nav_controller.launch"
      global_planner: "navfn/NavfnROS"
      local_planner: "base_local_planner/TrajectoryPlannerROS"
      scan_topic: "scan"
      pose_topic: "amcl_pose"
    driver:
      package_name: "dual_arm_robot_config"
      executable: "dual_arm_robot_nav_driver.launch"
      odom_topic: "odometry/filtered"
      cmd_vel_topic: "cmd_vel"
  manipulation:
    controller:
      package_name: "dual_arm_robot_config"
      executable: "dual_arm_robot_manip_controller.launch"
      args: "debug:=false"
      planning_groups: ["l_arm", "r_arm"]
    driver:
      package_name: "dual_arm_robot_config"
      executable: "dual_arm_robot_manip_driver.launch"
  gripper:
    controller:
      package_name: "temoto_gripper_converter"
      executable: "gripper_temoto_controller.launch"
    driver:
      package_name: "gripper_bringup"
executable: "gripper_driver.launch"The Robot Manager Interface or RMI provides a bridge to users or other applications to access the functionalities of Temoto Robot Manager. Its main objective is to simplify the use of TRM via providing a C++ based API.
| Return | Function | Arguments | Description |
|---|---|---|---|
| void | initialize | Initialize Robot Manager Interface | |
| void | loadRobot | const std::string& robot_name | Load the robot as resource |
| void | planManipulation | const std::string& robot_name,const std::string& planning_group, const geometry_msgs::PoseStamped& pose | Compute a trajectory to a desired pose with a defined planning group |
| void | planManipulation | const std::string& robot_name,const std::string& planning_group, const std::string& named_target_pose | Set the current joint values to a named target pose specified in the SRDF |
| void | planManipulation | const std::string& robot_name, const std::string& planning_group, const std::vector< double > &joint_state_target | Specify an absolute value for each joint |
| void | executePlan | robot_name | Execute a plan |
| geometry_msgs::PoseStamped | getEndEffPose | const std::string& robot_name, const std::string& planning_group | Get current pose of the end effector |
| std::vector< double > | getCurrentJointValues | const std::string& robot_name, const std::string& planning_group | Get the current joint values |
| std::vector< std::string> | getNamedTargets | const std::string& robot_name, const std::string& planning_group | Get names of the robot states available as targets in the SRDF |
| void | navigationGoal | const std::string& robot_name, const geometry_msgs::PoseStamped& pose | Send a goal pose to the mobile base |
| void | controlGripperPosition | const std::string& robot_name, const float& position | Send a value for opening and closing gripper command |
Note: In previous tutorials, we created a "custom_temoto_config" package from scratch to understand the structure of the TeMoto config. All examples shown in this tutorial can be found and replicated via Temoto Tutorials repository, which contains a set of TeMoto actions to control a robot.
This tutorial launches a dual arm mobile manipulator (husky robot), that provides a navigation and manipulation functionalities. For this demo (1), we will use a regular ROS Node with a RMI object to load and command the robot.
This node creates a RMI object, that provides a simplified API for communicating with the Robot Manager. The first step is to initialize the robot, which basically launches the drivers and controllers defined on the robot_description.yaml file, then it sends a navigation goal for the mobile base, and once the robot reaches the goal, the node commands the arm to move the arm to a target pose. At the end, the process manager unloads all of the resources.
Start TeMoto
roslaunch tutorials_temoto_config temoto_husky.launch temoto_namespace:=my_temotoRun the node that uses the RMI to command the robot.
rosrun tutorials_temoto_config rmi_command_robot __ns:=my_temotoIf you want to change the goal poses, change the values of the target_pose in the "rmi_command_robot.cpp", build and run it again.
The ta_navigation_action provided on the Temoto_tutorials contains the required commands to send a 2D navigation goal to a mobile base using the RMI.
Start TeMoto
roslaunch tutorials_temoto_config temoto_husky.launch temoto_namespace:=my_temotoInitialize the robot
roslaunch ta_initialize_robot invoke_action.launch wake_word:=my_temotoWait until the robot is fully initialized You should see in the terminal
vaultbot_sim initializedTrigger the TeMoto Action
roslaunch ta_navigate_robot invoke_action.launch wake_word:=my_temotoOnce the robot reaches the location, you should see in the terminal
Goal reached
[from my_temoto/executeTemotoAction]: Done navigating
Action instance destructed
[monitoringLoop] Clearing umrf graph 'ta_navigate_robot'
You can change the navigation goal on the ta_navigation_robot.umrfg.json file. There is no need to build again. Trigger the TeMoto Action again.
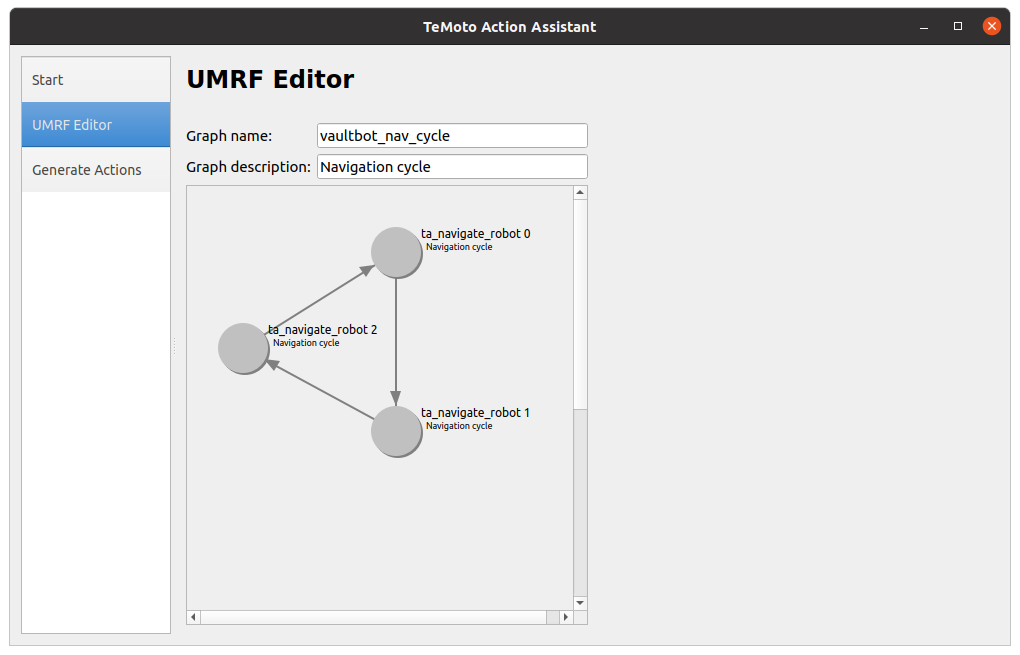
For this demo(3) we will trigger a UMRF graph that contains three navigation actions in a loop (same action with different input parameters).

Figure 8: UMRF Graph with 3 navigation actions in cycle.
Launch TeMoto:
roslaunch tutorials_temoto_config temoto_husky.launch temoto_namespace:=my_temotoNow let's invoke an UMRF graph (combines TeMoto actions to a graph) which orchestrates our navigation behavior. First open another terminal and go to the umrf graphs directory
roscd tutorials_temoto_config/../umrf_graphsRun an action that initializes the robot:
rosrun temoto_action_engine umrf_graph_publisher vaultbot_initialize.umrfg.json my_temotoAfter husky Gazebo sim has been successfully loaded, make it navigate through 3 goal locations repeatedly (invoke the command in the same terminal as the last one):
rosrun temoto_action_engine umrf_graph_publisher vaultbot_nav_cycle.umrfg.json my_temotoIn order to stop the navigation graph, run:
rostopic pub /broadcast_stop_umrf_graph temoto_action_engine/BroadcastStopUmrfGraph "umrf_graph_name: 'vaultbot_nav_cycle'
targets:
- 'my_temoto'"Note: If you created the temoto_config from scratch, follow the instructions in this section to make sure you have all of the components to run TRM.
In order to use TeMoto Robot Manager subsystem within TeMoto, you need to run the temoto_robot_manager node.
- Make sure you have the following lines in your temoto.launch file:
<arg name="robot_config_base_path" default="$(find tutorials_temoto_config)/config" />

<node name="temoto_robot_manager"
      pkg="temoto_robot_manager"
      type="temoto_robot_manager"
      output="screen"
      respawn="$(arg respawn_nodes)"
      args="--config-base-path $(arg robot_config_base_path)"/>
See temoto.launch for reference.
-
Include temoto_robot_manager in the find_package section of the CMakeList.txt
-
Add the dependency to the package.xml
<depend>temoto_robot_manager</depend>Note that the robot_config_base_path points to the config folder that holds the robot_description.yaml file. For example, the included "tutorials_temoto_config/config/robot_description.yaml" contains description, navigation, and manipulation information for the simulated dual arm Husky robot used in this Tutorial. More information on configuring the robot_description.yaml can be found in Overview 4.
- To use the Robot Manager Interface either in a regular ROS c++ Node or in a TeMoto action, include the following header
#include "temoto_robot_manager/robot_manager_interface.h"- To create a Robot Manager Interface Object
temoto_robot_manager::RobotManagerInterface rmi_;
rmi_.initialize();
Now you should be able to either initialize or command a robot using the RMI.