这是我的 STL 源码学习笔记,持续更新中。 STL 来自 9.1.0 版 gcc 里面的 libstdc++。
内容目录:
狭义上说,STL 容器需要一定内存空间来存储我们放入的元素。比如,每次我们往 vector 中 push_back 元素的时候,STL容器会自动为放入的元素分配堆里面的内存。一般而言,我们可以直接用 new 关键字来分配内存,但是 STL 提供了更灵活的机制,就是用 Allocator 来分配空间。
一般我们用 new 关键字在堆里面构造对象,实际上做了两件事:
- 用 ::operator new 在堆里面分配对象所需空间(注意 ::operator new 和 new 是不一样的)
- 调用构造函数,构造出对象
类似的,对于 vector arr(1); 这样的声明,容器的 allocator 也需要两步来构造对象:
- 在堆里分配对象所需的空间
- 调用构造函数,把对象放在分配好的内存上
当 STL 容器析构的时候,对于容器内元素的析构,则需要:
- 调用析构函数,清理资源
- 释放掉为该对象分配的空间
所以一个 Allocator 的定义一般如下:
其中,allocate() 负责分配空间,construct() 负责调用对象的构造函数,destroy() 负责调用对象的析构函数,deallocate() 负责释放已分配的空间。
如果去看 vector 的定义,可以看到:
  template<typename _Tp, typename _Alloc = std::allocator<_Tp> >
    class vector : protected _Vector_base<_Tp, _Alloc>
    {/** ... **/ };
模板参数 _Alloc 就是 Allocator 的类型,其默认类型为定义在 <bits/allocator.h> 里的 allocator。然而如果去看 allocator 的定义,发现其具体实现要追溯到其基类。
gcc 中的默认 allocator 是 new_allocator,定义在 ext/new_allocator.h 里面。
new_allocator 使用 ::operator new 来分配空间,其底层就是最常用的 malloc()。
来看一下其 allocate() 方法的实现,就是通过调用 ::operator new (size_t ) 来完成空间分配的。
      pointer
      allocate(size_type __n, const void* = static_cast<const void*>(0))
      {
	if (__n > this->max_size())
	  std::__throw_bad_alloc();

#if __cpp_aligned_new
	if (alignof(_Tp) > __STDCPP_DEFAULT_NEW_ALIGNMENT__)
	  {
	    std::align_val_t __al = std::align_val_t(alignof(_Tp));
	    return static_cast<_Tp*>(::operator new(__n * sizeof(_Tp), __al));
	  }
#endif
	return static_cast<_Tp*>(::operator new(__n * sizeof(_Tp)));
      }
更具体的注释将直接在仓库源码中给出。
。
pool_allocator 定义在 <ext/pool_allocator.h> 里,实际类名为 __pool_alloc, 其继承于 __pool_alloc_base 。
pool_allocator 采用如下机制分配内存:
- 如果被全局强制要求用 new 分配,使用 :: operator new 为对象分配内存
- 如果要求分配的空间大小超过阈值 s_max,则直接用 :: operator new 分配内存
- 如果小于阈值 s_max,则通过数据结构 free_list(空闲链表)来分配内存
注:如果了解 malloc 的底层实现机制,会发现这里的 free_list 和 malloc 的分配器实现并无太大区别。
该分配器的 allocate() 实现如下:
  template<typename _Tp>
    _Tp*
    __pool_alloc<_Tp>::allocate(size_type __n, const void*)
    {
      pointer __ret = 0;
      if (__builtin_expect(__n != 0, true))
	{
	  if (__n > this->max_size())
	    std::__throw_bad_alloc();

	  const size_t __bytes = __n * sizeof(_Tp);

#if __cpp_aligned_new
	  if (alignof(_Tp) > __STDCPP_DEFAULT_NEW_ALIGNMENT__)
	    {
	      std::align_val_t __al = std::align_val_t(alignof(_Tp));
	      return static_cast<_Tp*>(::operator new(__bytes, __al));
	    }
#endif

	  // If there is a race through here, assume answer from getenv
	  // will resolve in same direction.  Inspired by techniques
	  // to efficiently support threading found in basic_string.h.
	  if (_S_force_new == 0)
	    {
	      if (std::getenv("GLIBCXX_FORCE_NEW"))
		__atomic_add_dispatch(&_S_force_new, 1);
	      else
		__atomic_add_dispatch(&_S_force_new, -1);
	    }

      // 如果要求分配的内存空间大于 s_max ,或者强制使用 new 分配
	  if (__bytes > size_t(_S_max_bytes) || _S_force_new > 0)
	    __ret = static_cast<_Tp*>(::operator new(__bytes));
	  else
      // 使用空闲链表进行分配
	    {
	      _Obj* volatile* __free_list = _M_get_free_list(__bytes);

	      __scoped_lock sentry(_M_get_mutex());
	      _Obj* __restrict__ __result = *__free_list;
	      if (__builtin_expect(__result == 0, 0))
		__ret = static_cast<_Tp*>(_M_refill(_M_round_up(__bytes)));
	      else
		{
		  *__free_list = __result->_M_free_list_link;
		  __ret = reinterpret_cast<_Tp*>(__result);
		}
	      if (__ret == 0)
		std::__throw_bad_alloc();
	    }
	}
      return __ret;
    }
。
C++ 在标准库中提供了一个字符串类 string,该类是 basic_string<char> 的别名 。模板类 basic_string 定义在 <bits\basic_string.h> 中,该类的声明如下:
  template<typename _CharT, typename _Traits = char_traits<_CharT>,
           typename _Alloc = allocator<_CharT> >
    class basic_string;
该文件很大,有几千行,实际包含了两个 basic_string 的实现(见下方代码块),这两个 basic_string 的实现差异较大。对于前者,计算 sizeof(string) 的结果为 32,对于后者,计算 sizeof(string) 的结果为 8。可以通过把 _GLIBCXX_USE_CXX11_ABI 定义为 1 或者 0 来切换两者实现,观察效果。
#if _GLIBCXX_USE_CXX11_ABI
	template<typename _CharT, typename _Traits = char_traits<_CharT>,
           typename _Alloc = allocator<_CharT> > class basic_string {
               // ...
               // 计算 sizeof(string) 结果为 32
           };
#else
	template<typename _CharT, typename _Traits = char_traits<_CharT>,
           typename _Alloc = allocator<_CharT> > class basic_string {
               // ...
               // 引用计数版的实现
               // 计算 sizeof(string) 结果为 8
           };
2019 年的 g++ 默认情况下是使用前者的。所以我只分析前者的实现。
basic_string 有 3 个成员变量,_M_dataplus 是一个保存数据指针 _M_p 的结构体,占据 8 个字节,_M_string_length 表示当前字符串长度,占据 8 个字节,然后有个大小为 16 字节的联合体,存储 _M_allocated_capacity 和 _M_local_buf。类图如下:
basic_string 的数据存储方式要分两种情况讨论:
- 较短的字符串(不到16字节,比如 “abc" ),保存在 _M_local_buf 里面,在栈上面
- 较长的字符串(超过16字节,比如 "abcdeabcdeabcdeabcde"),保存在堆上
可以通过如下代码测试数据保存的位置:
#include <string>
#include <cstdio>

using namespace std;

int main() {
    string s1("abcdeabcdeabcdeabc");
    printf("0x%08x 0x%08x\n", &s1, s1.data());
    string s2("abcdeabcdeabcde");
    printf("0x%0x 0x%08x\n", &s2, s2.data());
    return 0;
}
我在自己机器上打印出来的结果为:
0xd145a6b0 0x01e27c20 # 存储在堆上
0xd145a6d0 0xd145a6e0 # 存储在栈上
可以很明显地看到,对于长度超过 16 字节的字符串,其存储位置就在 basic_string 地址起点向后偏移 16 字节的位置,也就是存储在 _M_local_buf 里面。
basic_string 支持通过 operator += 或者 append() 函数拼接字符串,其具体实现在 <bits/basic_string.tcc> 里面。我以 _M_append() 方法为例,说明一下拼接过程:
  // 向当前字符串的尾部拼接新的字符串,具体实现
  // __s: 要拼接的 C 风格字符串
  // __n: __s 的长度
  template<typename _CharT, typename _Traits, typename _Alloc>
    basic_string<_CharT, _Traits, _Alloc>&
    basic_string<_CharT, _Traits, _Alloc>::
    _M_append(const _CharT* __s, size_type __n)
    {
      // 新的字符串长度
      const size_type __len = __n + this->size();

      // 如果已分配的空间容量足够
      if (__len <= this->capacity())
	{
    // 如果 __n 长度不为0,将 C 字符串拷贝到当前串的末尾
	  if (__n)
	    this->_S_copy(this->_M_data() + this->size(), __s, __n);
	}
    // 如果已分配的空间不足,先扩容再拷贝
      else
	this->_M_mutate(this->size(), size_type(0), __s, __n);

      // 设置新的长度
      this->_M_set_length(__len);
      return *this;
    }
basic_string 的拷贝复制会简单地执行深拷贝,而非采用写时复制、引用计数等技术。更详细的分析会在源码注释中给出。
变长数组 vector 是 STL 最常用的数据容器之一,用来顺序放置元素。其底层实现是一块连续空间,每次往分配的空间里放元素,如果刚好放满了,就对已分配空间扩容。
在 x86-64 架构下,如果我们在代码中计算 sizeof(任意vector),我们会发生计算出来的大小为 24。原因很简单,数组是在堆中分配的,vector对象本身只维护三个指针(见下图的 _Vector_impl_data 的三个成员变量),分别指向已分配空间开始位置、当前元素放到哪儿了、已分配空间的结束位置。
vector 的实际的实现在 <bits/stl_vector.h> 中,其继承于 _Vector_base, 类图如下:
调用 push_back 向 vector 添加元素,如果 _M_finish 指针小于 _M_end_of_storage ,则可以继续愉快地插入数据,否则调用 _M_relloc_insert 实现扩容并插入:
#if __cplusplus >= 201103L
  template<typename _Tp, typename _Alloc>
    template<typename... _Args>
      void
      vector<_Tp, _Alloc>::
      _M_realloc_insert(iterator __position, _Args&&... __args)
#else
  template<typename _Tp, typename _Alloc>
    void
    vector<_Tp, _Alloc>::
    _M_realloc_insert(iterator __position, const _Tp& __x)
#endif
    {
	// _M_check_len 一般情况下返回 size() * 2,即扩容后的大小
      const size_type __len =
	_M_check_len(size_type(1), "vector::_M_realloc_insert");
	// 记录旧指针位置
      pointer __old_start = this->_M_impl._M_start;
      pointer __old_finish = this->_M_impl._M_finish;
	// 之前放了多少个元素
      const size_type __elems_before = __position - begin();
	// 执行扩容
      pointer __new_start(this->_M_allocate(__len));
      pointer __new_finish(__new_start);
      __try
	{
	  // The order of the three operations is dictated by the C++11
	  // case, where the moves could alter a new element belonging
	  // to the existing vector.  This is an issue only for callers
	  // taking the element by lvalue ref (see last bullet of C++11
	  // [res.on.arguments]).
	  // 把要插入的新元素 移动/拷贝 到新存储分配的空间的对应位置上
	  // 此时旧的空间上的元素还没有拷过来
	  _Alloc_traits::construct(this->_M_impl,
				   __new_start + __elems_before,
#if __cplusplus >= 201103L
				   std::forward<_Args>(__args)...);
#else
				   __x);
#endif
	  __new_finish = pointer();

#if __cplusplus >= 201103L
	  if _GLIBCXX17_CONSTEXPR (_S_use_relocate())
	    {
	      __new_finish = _S_relocate(__old_start, __position.base(),
					 __new_start, _M_get_Tp_allocator());

	      ++__new_finish;

	      __new_finish = _S_relocate(__position.base(), __old_finish,
					 __new_finish, _M_get_Tp_allocator());
	    }
	  else
#endif
	    {
		// 因为新插入的元素可能在数组中的任何位置(insert也会导致扩容),所以分两次拷贝原空间里的数据
		// 先拷贝 [_old_start, _position) 到 [_new_start, ),
		// 再拷贝 [_position, _old_finish) 到 [_new_finish, ) 上去
	      __new_finish
		= std::__uninitialized_move_if_noexcept_a
		(__old_start, __position.base(),
		 __new_start, _M_get_Tp_allocator());

	      ++__new_finish;

		// __uninitialized_move_if_noexcept_a 在 <bits/stl_uninitialized> 中,
	      __new_finish
		= std::__uninitialized_move_if_noexcept_a
		(__position.base(), __old_finish,
		 __new_finish, _M_get_Tp_allocator());
	    }
	}
      __catch(...)
	{
	  if (!__new_finish)
	    _Alloc_traits::destroy(this->_M_impl,
				   __new_start + __elems_before);
	  else
	    std::_Destroy(__new_start, __new_finish, _M_get_Tp_allocator());
	  _M_deallocate(__new_start, __len);
	  __throw_exception_again;
	}
#if __cplusplus >= 201103L
      if _GLIBCXX17_CONSTEXPR (!_S_use_relocate())
#endif
	// 析构扩容前空间里的对象
	std::_Destroy(__old_start, __old_finish, _M_get_Tp_allocator());
      _GLIBCXX_ASAN_ANNOTATE_REINIT;
	// 释放扩容前使用的空间
      _M_deallocate(__old_start,
		    this->_M_impl._M_end_of_storage - __old_start);
	// 重新定位三个指针
      this->_M_impl._M_start = __new_start;
      this->_M_impl._M_finish = __new_finish;
      this->_M_impl._M_end_of_storage = __new_start + __len;
    }
更多的分析将在源码中给出。
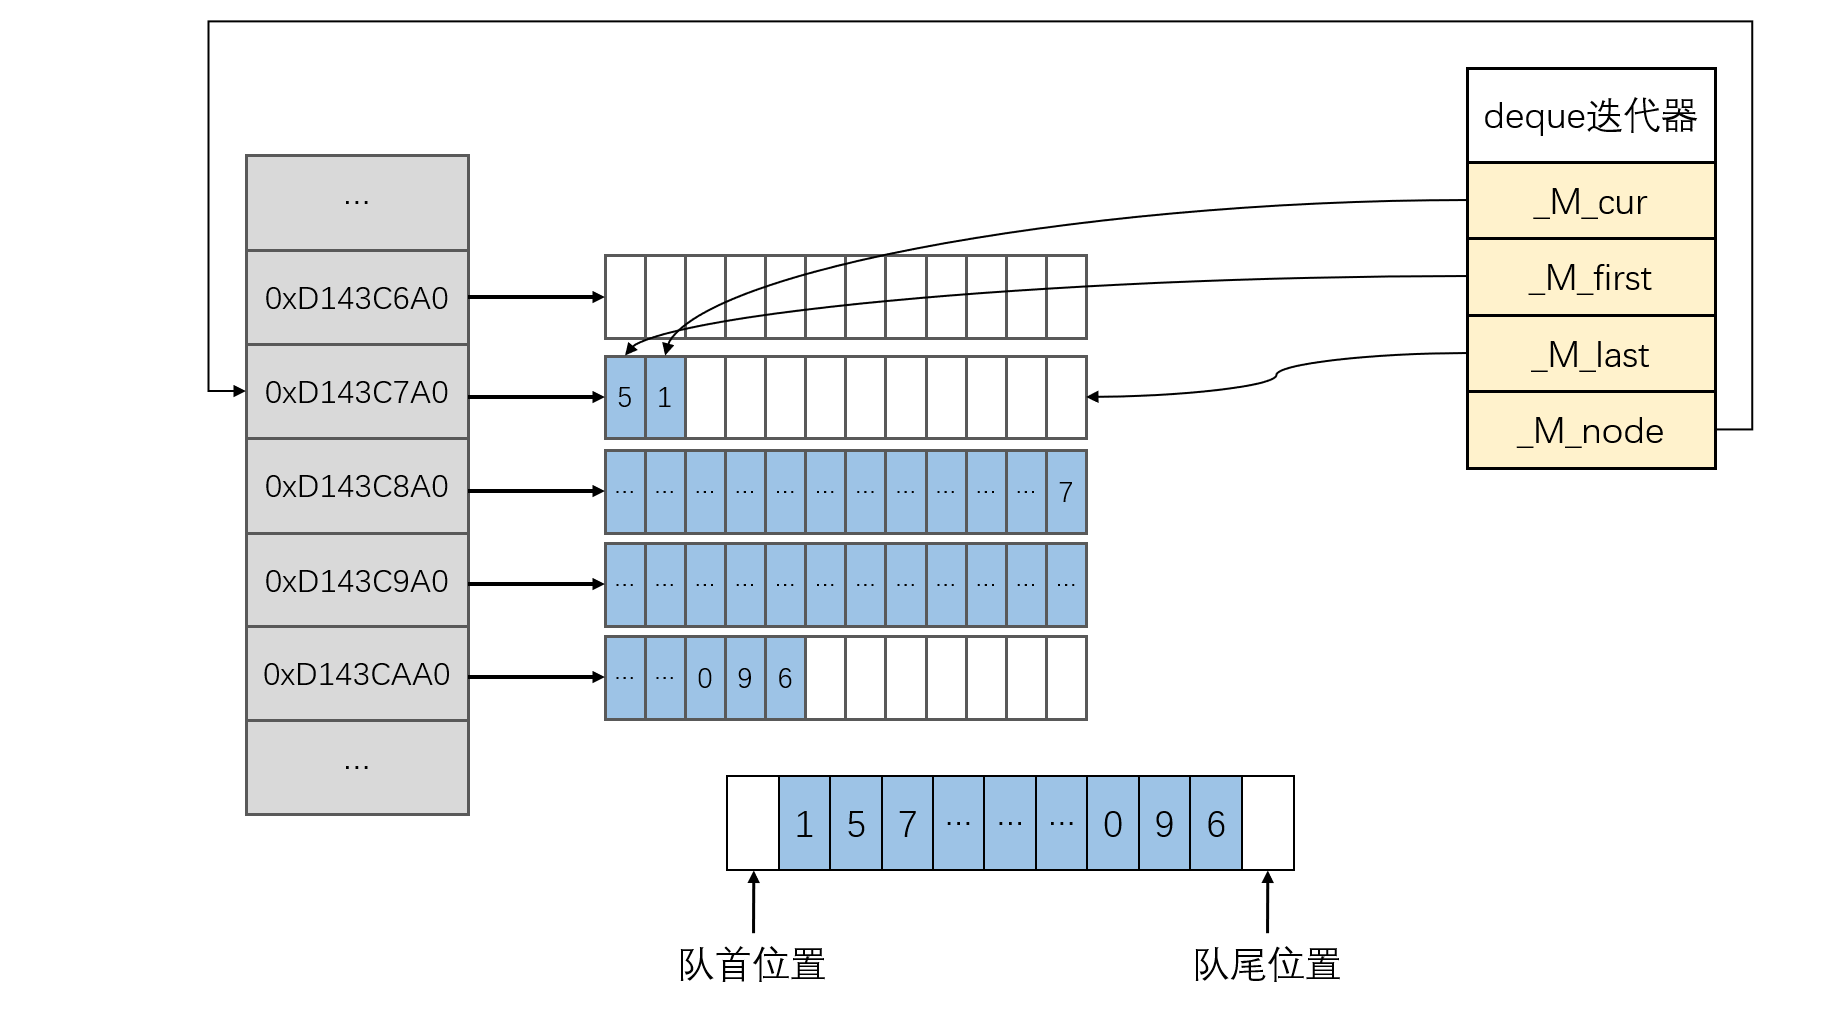
双端队列 deque 相比于 vector,可以实现在常数时间内向头部插入数据(push_front)。因为连续数组的头部插入效率是 O(n),此时再使用内存上的连续数组便无法满足这样的需求。deque 使用分段连续空间来存储数据,其数据结构类似开散列的哈希表,如下图所示:
简单来说,deque 的数据分段存储在多个子数组上,通过对数据分段,每次向头部插入数据的时候,只需要移动 _M_cur 指针然后插入数据即可。即使队首所在的数组可用空间不够,也可以通过新申请一个子数组来实现。
在 x86-64架构下,如果我们计算 sizeof(deque>,会得到80字节的大小。原因见下面的类图,因为 _Deque_iterator 包含4个指针,大小为 4 * 8 = 32,一个 _Deque_impl 包含两个这样的迭代器,一个 size_t 类型的成员,和一个 _Tp ** 类型的指针,故大小为 32 * 2 + 8 + 8 = 80。类图如下:
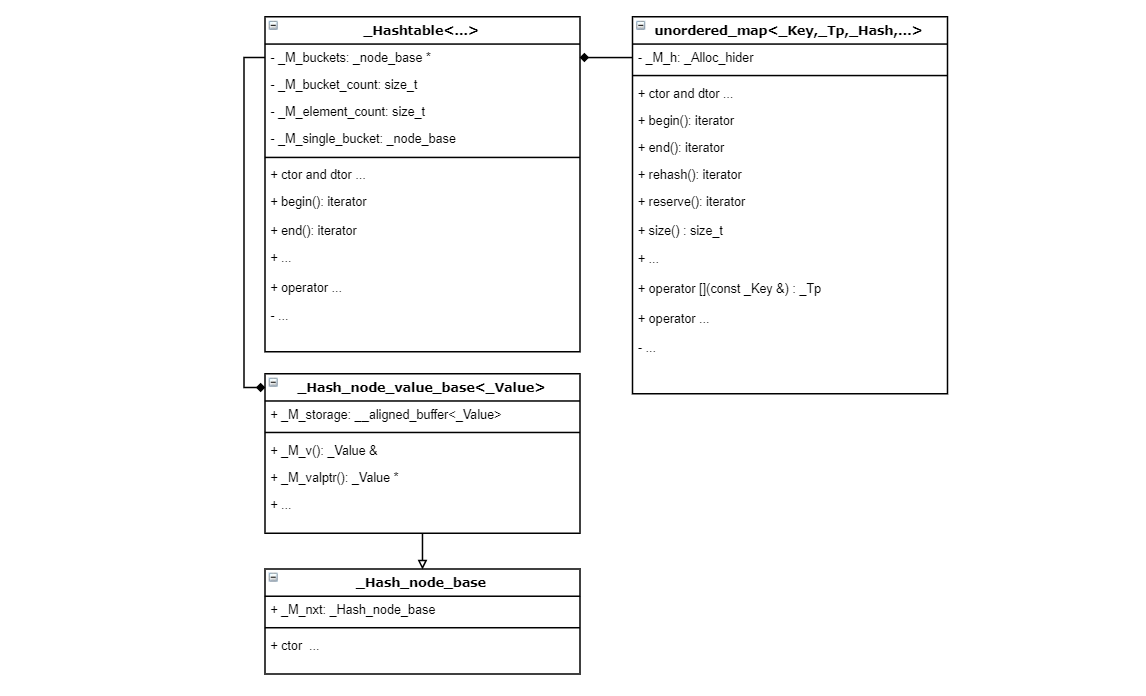
unordered_map 也是常用的 STL 容器,作用是在 O(1) 时间内插入和查找键值对,类似于 JDK 里的 HashMap。unordered_map 的实现在 <bits/unordered_map.h> 中。unordered_map 的类图(不准确,画个大概)如下:
unordered_map 有一个 _Hashtable 类型的成员 _M_h,这个成员,顾名思义,就是一个哈希表,是插入、查找、删除操作的真正执行者。
// 插入操作的分析,待续。。。
关于 hashtable 的扩容:
- 触发条件:一旦插入的元素总数超过(当前桶的总数 * 最大负载因子),就执行扩容。
- 扩容大小:一般增长两倍,取最近的一个素数
// 待续。。。
标准库提供的 sort 函数声明在 <bits/stl_algo.h> 里,传入一个顺序容器的首尾迭代器,可以对两个迭代器之间的数据进行排序,其时间复杂度为 O(n lgn)。该排序过程是不稳定的,即相同大小的待排元素在排序前后的相对顺序可能发生变化。
sort 函数的真正实现在 <bits/stl_algo.h> 里的 __sort 函数里,其函数签名为:
  template<typename _RandomAccessIterator, typename _Compare>
    inline void __sort(_RandomAccessIterator __first, _RandomAccessIterator __last, _Compare __comp);
该函数分两步实现排序过程:
- 使用 introsort 使数组达到近似有序的状态
- 使用插入排序完成最终的排序操作(插入排序对近似有序的数组的排序效率较高,近似 O(n) 复杂度)
// 内省排序
std::__introsort_loop(__first, __last, std::__lg(__last - __first) * 2, __comp);
// 插入排序
std::__final_insertion_sort(__first, __last, __comp);
Introsort 类似快速排序,大体思路如下:
- 使用近似快速排序,一直排序到子数组长度小于 _S_threshold
- 递归过深的时候,对子数组做堆排序
  // 类似快速排序,但是并不实现完整的快排,只需要大致有序(局部无序子结构大小 < 16)
  template<typename _RandomAccessIterator, typename _Size, typename _Compare>
    void
    __introsort_loop(_RandomAccessIterator __first,
		     _RandomAccessIterator __last,
		     _Size __depth_limit, _Compare __comp)
    {
      // _S_threshold 默认为 16,递归到子数组长度小于16时退出递归
      while (__last - __first > int(_S_threshold))
	{
    // 递归过深,但是仍然无法达到大致有序的状态时,使用堆排序
	  if (__depth_limit == 0)
	    {
	      std::__partial_sort(__first, __last, __last, __comp);
	      return;
	    }
	  --__depth_limit;
    // __cut 为 pivot 分割点
	  _RandomAccessIterator __cut =
	    std::__unguarded_partition_pivot(__first, __last, __comp);
    // 递归调用自身,对 __cut 到 __last 部分的数据进行 introsort
	  std::__introsort_loop(__cut, __last, __depth_limit, __comp);
    // 重设 __last 指针,在下一次 while 循环中对左半部分排序,减少递归次数
	  __last = __cut;
	}
    }
快速排序中的 partition 如下:
  // 快速排序中的 Partition 操作的具体实现
  template<typename _RandomAccessIterator, typename _Compare>
    _RandomAccessIterator
    __unguarded_partition(_RandomAccessIterator __first,
			  _RandomAccessIterator __last,
			  _RandomAccessIterator __pivot, _Compare __comp)
    {
     	// ... // 该过程和大多数快排实现类似
    }

  /// This is a helper function...
  // 快速排序中的 partition 操作
  template<typename _RandomAccessIterator, typename _Compare>
    inline _RandomAccessIterator
    __unguarded_partition_pivot(_RandomAccessIterator __first,
				_RandomAccessIterator __last, _Compare __comp)
    {
      // 中间位置的迭代器
      _RandomAccessIterator __mid = __first + (__last - __first) / 2;
      // 对于处在 __first + 1, __mid, __last - 1 三个位置的元素,取第二大的元素为
      // pivot_value,然后跟 __first 位置上的元素交换位置
      std::__move_median_to_first(__first, __first + 1, __mid, __last - 1,
				  __comp);
      return std::__unguarded_partition(__first + 1, __last, __first, __comp);
    }


