Integration between ERPNext and DATEV.
-
When a voucher is submitted, it will be sent to DATEV Unternehmen Online by email. Either by converting the document to PDF first (outgoing vouchers) or by sending files attached to the document (incoming vouchers).
-
DATEV CSV Export
Export raw GL Entries from ERPNext in the DATEV CSV format.
- Go to https://frappecloud.com/dashboard/#/sites and click the "New Site" button.
- In Step 2 ("Select apps to install"), select "ERPNext" and "DATEV Unternehmen Online Integration".
- Complete the new site wizard.
-
Datev Settings
Configure you client number, you tax consultant's number and a temporary against account.
-
DATEV Report
Now you can use the report "DATEV". This is a preview of the transactions data. It can be exported, along with the master data, as zip file via the report's menu. Your tax xonsultant can then import your GL Entries into his DATEV system.
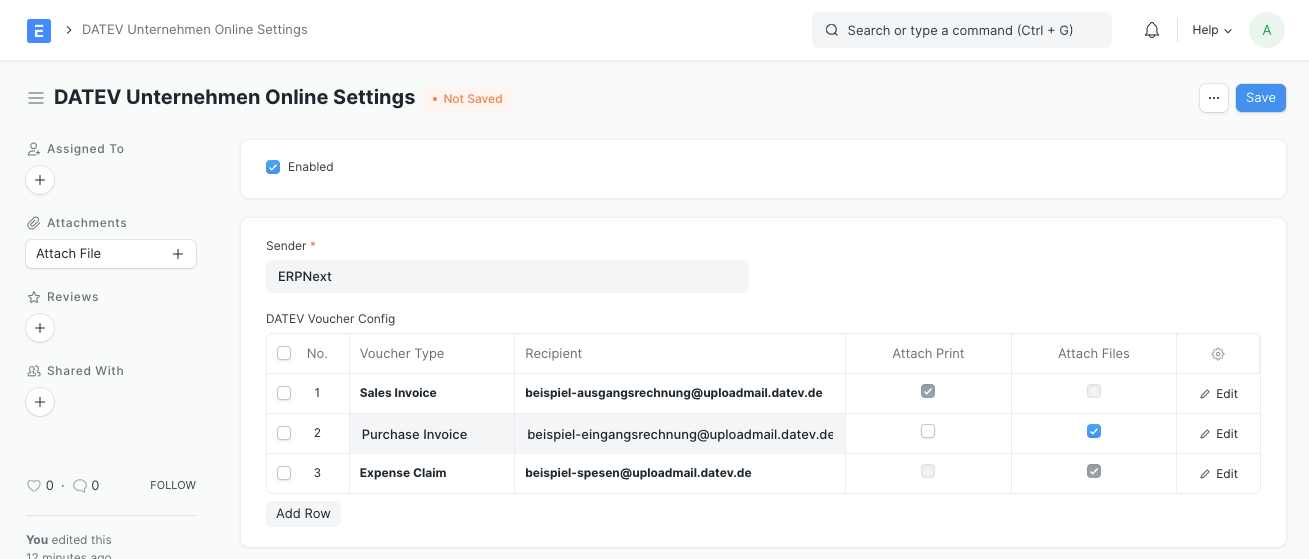
- Open DATEV Unternehmen Online Settings
- Enable the integration
- Select the Email Account that should be used to send receipts to DATEV Unternehmen Online
- Add a row to the table
- Select the Voucher Type (Sales Invoice, Purchase Invoice or Expense Claim)
- Paste the target email address provided by DATEV Unternehmen Online (DATEV Help Center)
- Enable "Add Attachments" or "Add Print"
- Save
- Öffnen Sie DATEV Unternehmen Online-Einstellungen (engl. DATEV Unternehmen Online Settings)
- Aktivieren Sie die Integration
- Wählen Sie das E-Mail-Konto (engl. Email Account) aus, das für den Versand von Belegen an DATEV Unternehmen Online verwendet werden soll
- Fügen Sie der Tabelle eine Zeile hinzu
- Wählen Sie die Belegart (engl. Voucher Type)
- Fügen Sie die für diese Belegart von DATEV Unternehmen Online bereitgestellte Ziel-E-Mail-Adresse ein (mehr dazu im DATEV Help Center)
Achtung: Die E-Mail-Adresse des Senders muss mit dem in Schritt 3 ausgewählten E-Mail-Konto übereinstimmen
- Aktivieren Sie "Anhänge hinzufügen" oder "Druck hinzufügen".
- Speichern Sie die DATEV Unternehmen Online-Einstellungen
Falls Sie PDF on Submit für dieselbe Belegart verwenden, wählen Sie "Anhänge hinzufügen" statt "Druck hinzufügen". PDF on Submit fügt dann die PDF-Datei als Anhang zum Beleg hinzu und die DATEV-Integration versendet diesen.
"DATEV" and "DATEV Unternehmen Online" are trademarks of DATEV eG. This integration is not approved or endorsed by DATEV eG.
GPLv3
