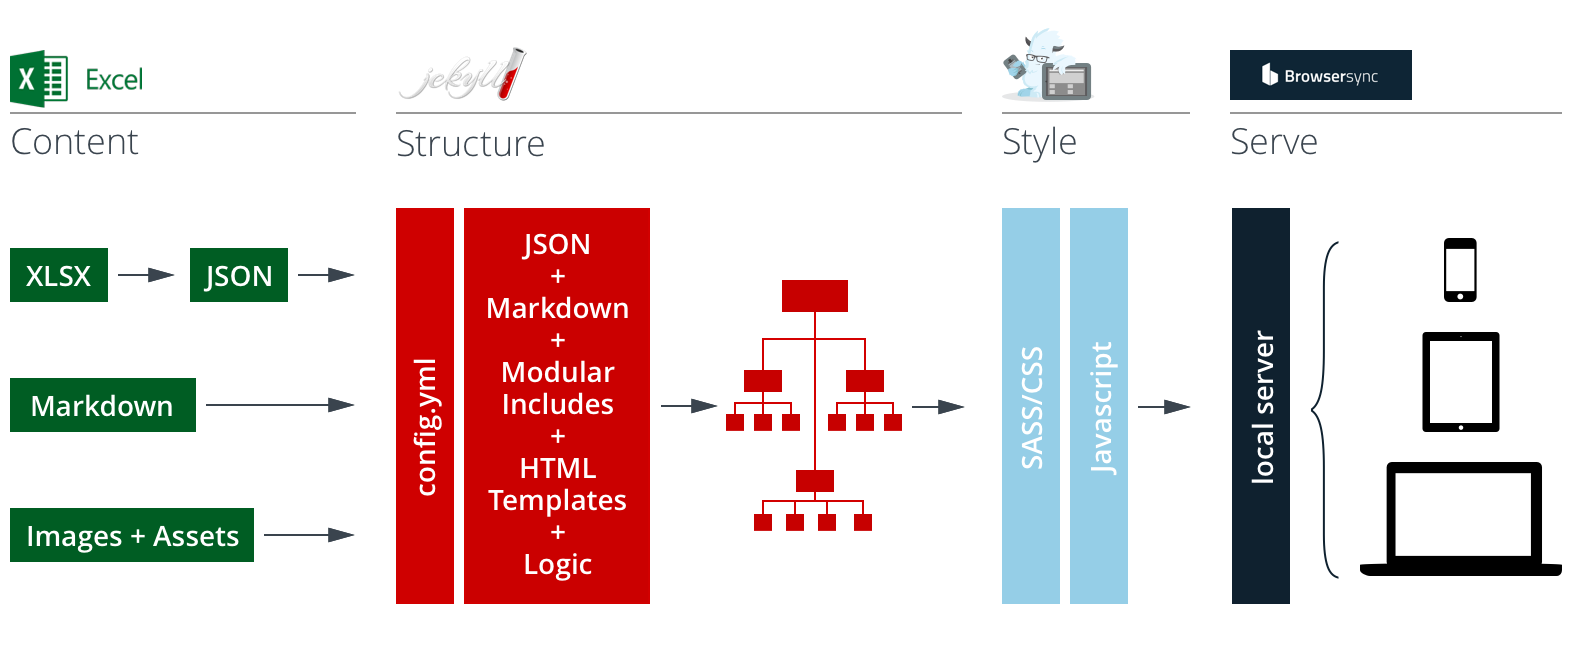
The Content First Prototyping Framework is an open source toolkit that helps you bring real, dynamic content into your prototyping process. It works by taking your structured content from Excel Spreadsheets and assembling it into simple templates using Jekyll. It then serves everything to you in interconnected pages styled with Foundation. When you initially build your prototype, all the pieces are automatically put in place. Whenever you save changes to content, template, or style files, the system updates your build and serves the changes to your device(s).
If this is the first page you’ve visited about content first prototyping, be sure to also check out the Smashing Magazine article that introduces the framework. If you’re looking for a bare bones version of the framework to clone as a staring point for your own project, check out the cfp-framework repository instead.
To use the framework, you’ll need make sure you have a couple things installed:
- Command line tools
- Ruby (if you’re on a Mac this is probably already installed)
- Node.js
Once you’ve got your environment set up, install the project framework. (If you're new to the command line, open a terminal window and enter in the commands below. Leave off the "$" – that's a stand-in for the terminal prompt. If you get a permission error, type sudo before the line and enter your password when prompted.)
-
Install Jekyll (you may need to use
sudoif you see permission errors)$ gem install jekyllNB: If you get the error:
 ERROR:  While executing gem ... (Errno::EPERM)
   Operation not permitted - /usr/bin/listen
this is because /usr/bin is “off-limits” since El Capitan. If you run into this, try instead:
$ sudo gem install -n /usr/local/bin jekyllThanks to thamrick for finding the fix!
-
Clone/copy the Content first Prototyping Starter Kit to your project folder (this will take a minute or so)
$ git clone https://github.com/andybywire/content-first-prototyping.git- or -
Download and copy the .zip
-
Navigate to your project file and install the framework dependencies
$ cd <path to your project folder> $ npm install -
Run
npm start. Once installed, this is the only command you'll need to run to begin a new session.$ npm start
The start command will assemble your site into the _site folder and then serve it to your default browser. You can copy this file to another server if you like, but don't edit any of these files in this folder directly – the next time the framework runs an update, it will overwrite any chages you've made.
In order to get the most out of the framework, it's worth familiarizing yourself with the basics of the tools it's built with. The documentation of all of these tools is excellent and should get you up to speed quickly:
In the meantime, here's a quick rundown of the framework's basic operations:
This is the start of the Content First Prototyping flow. Your structured data (product catalogues, personnel directories, event feeds, navigation, etc.) lives in the _data.xlsx, located in the _data file in the root directory. As you add rows to these sheets and save the document, your pages and site structure will be updated automatically.
During the initial build and at each save, Gulp processes your _data.xlsx sheets into JSON. The Jekyll Data Pages Generator then takes selected JSON arrays and processes them into pages (these pages are specified in the "Page Generator Settings" section of your _config.yml file).
You can add page or JSON data elements to your page templates by using Jekyll's page.variables and site.data.variables. Adding new sheets will automatically create a new JSON for that sheet. In order to process the new sheet into a set of pages, be sure to add it to the "Page Generator Settings" in _config.yml.
Pages, links, menus, and overall site structure is assembled by Jekyll. For each page you want to create, you'll tell Jekyll on which content to wrap in which template(s), and with which includes (if any). Each time you make a change to a template, markdown file, or include, your pages, site, and structure will be automatically updated and reloaded.
Be sure to check out the Jekyll documentation for a full rundown of how to create custom templates and structure.
All of the style and responsive behaviors in the framework are handled by the Foundation front-end framework. You can adjust Foundation's styles in the _settings.scss file (in the SCSS folder), or add your own styles either in CSS or SASS in the custom-styles.scss file (also in the SCSS file).
It can be tempting to simply write all your own styles here, but do check out the Foundation docs to make sure you're not duplicating something Foundation already does. Their style system is both tighly written and very flexible – and they already provide many of the basic elements you'll need.
