What you'll learn:
- How to correctly set up and solder your WiFly module
- How to install the Arduino libraries for WiFlyHQ and Lifegraph
- How to get your Arduino talking to the internet by making an example GET request
What you'll need:
- An Arduino ($30)
- A WiFly Module ($35)
- A Wifi network to connect to
- Strength of a tiger
If you've never touched an Arduino, make sure you've set up your Arduino environment!
Let's do it!
##0. Making sure the Arduino works
Make sure you have the Arduino Software installed: http://arduino.cc/en/main/software
Open up the Arduino IDE. Make sure your Arduino works by going to File -> Examples -> Basic -> Blink. Upload the code to your Arduino by selecting the correct usb port on Tools->Serial Port and select the correct arduino board from Tools->board. Upload your the blink code by clicking on the upload button.
This will make a light on your Arduino blink and is a super basic test of whether everything is working.
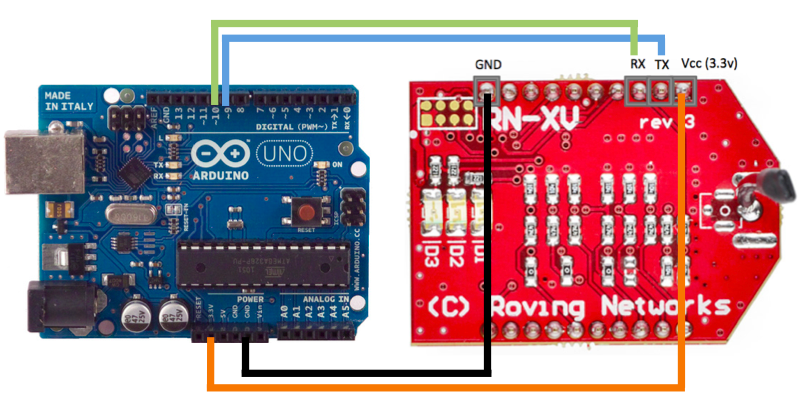
There are 4 pins that you need to connect from the WiFly module to the Arduino: 3.3v, GND, TX (for transmitting), and RX (for receiving).
These 4 pins correspond to the following on the WiFly module
- Pin 1 — 3.3v. Connect this to the 3.3v pin on the Arduino.
- Pin 2 — This is the Transmitter pin for the WiFly. Connect it to Digital pin 9 on the Arduino.
- Pin 3 — This is the Receiver pin for the WiFly. Connect it to Digital pin 10 on the Arduino.
- Pin 10 — Connect this to GND.
We recommend using male to male header pins because the WiFly is rather small and soldering directly pin to pin can be frustrating. Note that after soldering and connecting to the Arduino, if everything is correct, a red light will blink on the WiFly.
Now we have the hardware set up, the next step is to set up the software libraries.
We'll be using:
In order to setup the WiFlyHQ and Lifegraph Arduino Libraries, you'll need to download them both from github to your Arduino libraries folder. You can do this with git or without!
With Git:
If you have git, clone the WiFlyHQ repository and the Lifegraph repository into your Arduino libraries directory. On OSX this is typically in ~/Documents/Arduino/libaries/. If you don't have a libraries folder, you'll need to make one. sm130 for RFID reading is a good idea to install if you will be building Lifegraph-powered projects.
cd ~/Documents/Arduino/libraries
git clone https://github.com/harlequin-tech/WiFlyHQ
git clone https://github.com/lifegraph/arduino-lifegraph Lifegraph
git clone https://github.com/lifegraph/sm130
Without Git:
Go to WiFlyHQ to download a zip file of the directory, then extract the files into your Arduino libraries folder and call the extracted folder WiflyHQ. On OSX this is typically in ~/Documents/Arduino/libaries/. If you don't have a libraries folder, you'll need to make one. Then go to Lifegraph to download a zip file of the directory, and again extract the files into your Arduino libraries folder, this time calling the folder Lifegraph. It's a good idea to do the same with sm130 if you might use RFID in the future or build any Lifegraph-powered projects in the future.
The finished libraries folder should have a WiFlyHQ folder and an Lifegraph folder.
After you add the library, you'll need to restart the Arduino IDE for it to pick up the library. If you've added it in the right place, you should be able to see the WiFlyHQ and Lifegraph library if you go to Sketch -> Import Library. If you get an error complaining about a library not being named correctly (because it has a dash), just rename that folder in the Arduino/libraries folder to be WiFlyHQ or Lifegraph. Dashes are bad.
After you have the libraries installed, open up a new sketch in your Arduino environment, and copy the code for the helloworld example in lifegraph-arduino.
In helloworld.ino (lines 16 and 17), you'll need to change the SSID (name of your network) and the password to work with your own WiFi network:
const char mySSID[] = "your_ssid";
const char myPassword[] = "your_password";
To see if the code is working, we will test by doing a GET for the Lifegraph Labs Facebook Page.
Running the code will turn on a light attached to pin 13 and output on the terminal if there was a successful get request to the lifegraphlabs Facebook Page!
However, you can configure helloworld.ino to point to any Facebook graph endpoint to see that we can connect to the internet and everything is set up correctly.
Make sure you set the SSID and Password. Upload the code to the Arduino and press Tools -> Serial Monitor to see the output (makes sure the baud rate in the bottom right is set to 9600).
Great work! You have connected your hardware to the internet!
If you get an error, such as the WiFly not connecting or having get prompt errors, simply try again.
- GraphButton - press the button and have it post a message to your Facebook
- Notification light - a light that lights up when you have a new facebook notification
Get Help, Give Feedback, and More: Lifegraph Labs has Tutorials to connect the real world with the digital, Tools to get you started quickly, and Ideas of awesome things you could build right now. Go there now!


