-
Notifications
You must be signed in to change notification settings - Fork 17
Beta 11 changes
23 Aug 2014 - UNRELEASED
The new beta 11 introduces a key change to the way ADL Workbench operates. Previously the user had to specify manually the location of each logical 'repository' of archetypes. This has been replaced by a system where a 'repository' is now a physical file system location, e.g. a Git or SVN checkout area, and archetypes are found below this, in individual 'libraries'. The root point is identified with a special _repo.idx file, and each library root point contains a _repo_lib.idx file. These files only have to be written once in the repository, and effectively make the repositories self-describing.
The user now only has to specify the repository root points, for existing repositories, and the libraries will be read by the tool. This is made easier by additions to the workbench which allow it to use DVCS tools like Git and Subversion to clone, update and read repositories on the user's computer. Further, the URLs of 3 well-known Git repositories are known by the tool to enable easy initial installation.
Other changes to this version include a number of UI usability fixes, described below.
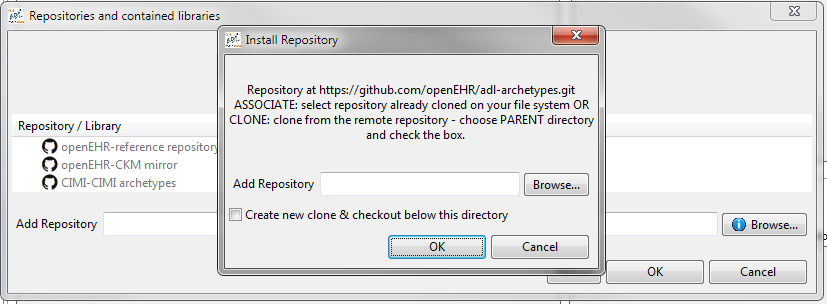
When a user first installs this new version of the tool, the following screen is seen:

The three rows correspond to 2 openEHR and one CIMI repositories. Any of these repositories can be 'installed' by hitting the install link, which will result in the following dialog:

There are two possibilities here:
- choose an existing checkout of the repository, which you may already have;
- create a new clone of the repository, in which case choose a parent directory.
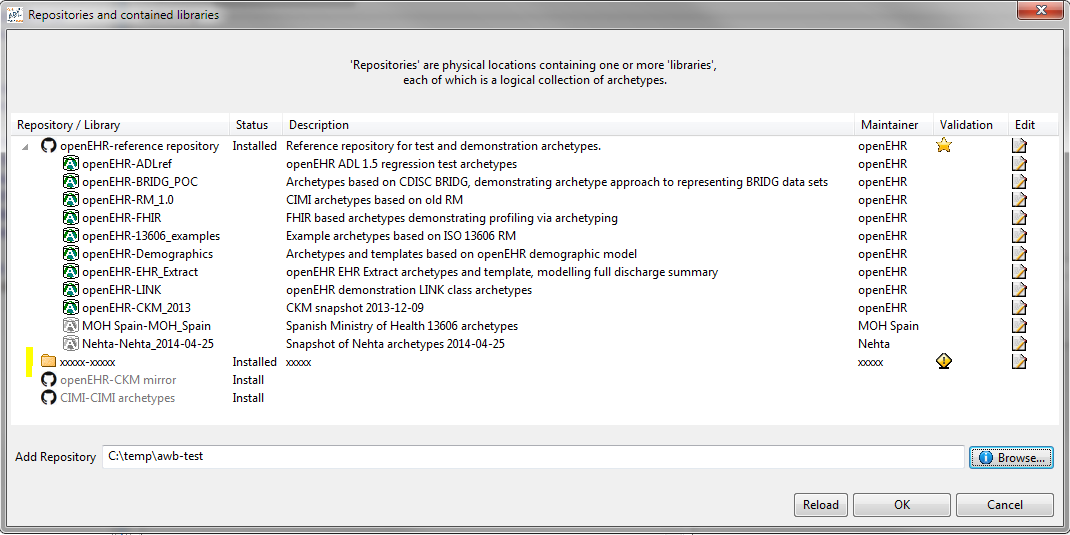
Doing either with the 'adl-archetypes' reference repository enables the archetype libraries to be read in and used. They are shown on the repository dialog as follows:

You can add a completely new repository as well, by using the 'Browse' button at the bottom of the dialog. If you choose a directory that is not already set up as an Archetype repository, the workbench will create the necessary control files for you, and save them. The result of doing this looks as follows:

Hitting the icon in the 'edit' column results in the text editor being launched, and you can edit the new repository meta-data, e.g.:

When you save and quit the editor, you will see the new repository details updated in the main dialog:

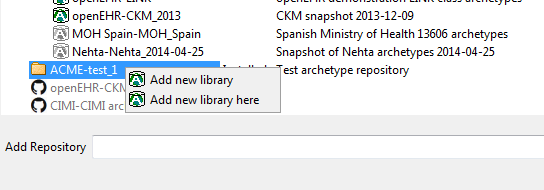
The next step in this add-new case is to define some libraries below the repository root point. All you are doing in fact is asking the tool to create _repo_lib.idx control files. You can do this in two ways:
- just create one control file at the root - 'add new library here' option, OR
- create one or more control files at various points below the root - 'add new library' option.
These options are available on right click on the new repository node:

Choosing either of these will result in a library row being added to the repository dialog view:

Once repositories and libraries have been set up as desired, the repository dialog can be dismissed, and the library selector can be used as in previous versions to select the desired repository. The effect of the repository setup activities causes just the repository root directories to be recorded in the .cfg file (you can see this via Tools > Options > Edit file).
A number of additions to the user interface have been made, to make the user's life easier:
- 'sticky' archetype tab choice: when an archetype is selected, whichever view (i.e. tab) is chosen, e.g. definition, interface etc, is automatically chosen for the next archetype the user selects.
- 'sticky' flat / differential view: the user's choice of flat or differential view likewise is retained across archetype selection.
- right-click tree expansion options on the archetype explorer enable the tree to be fully expanded in one go.