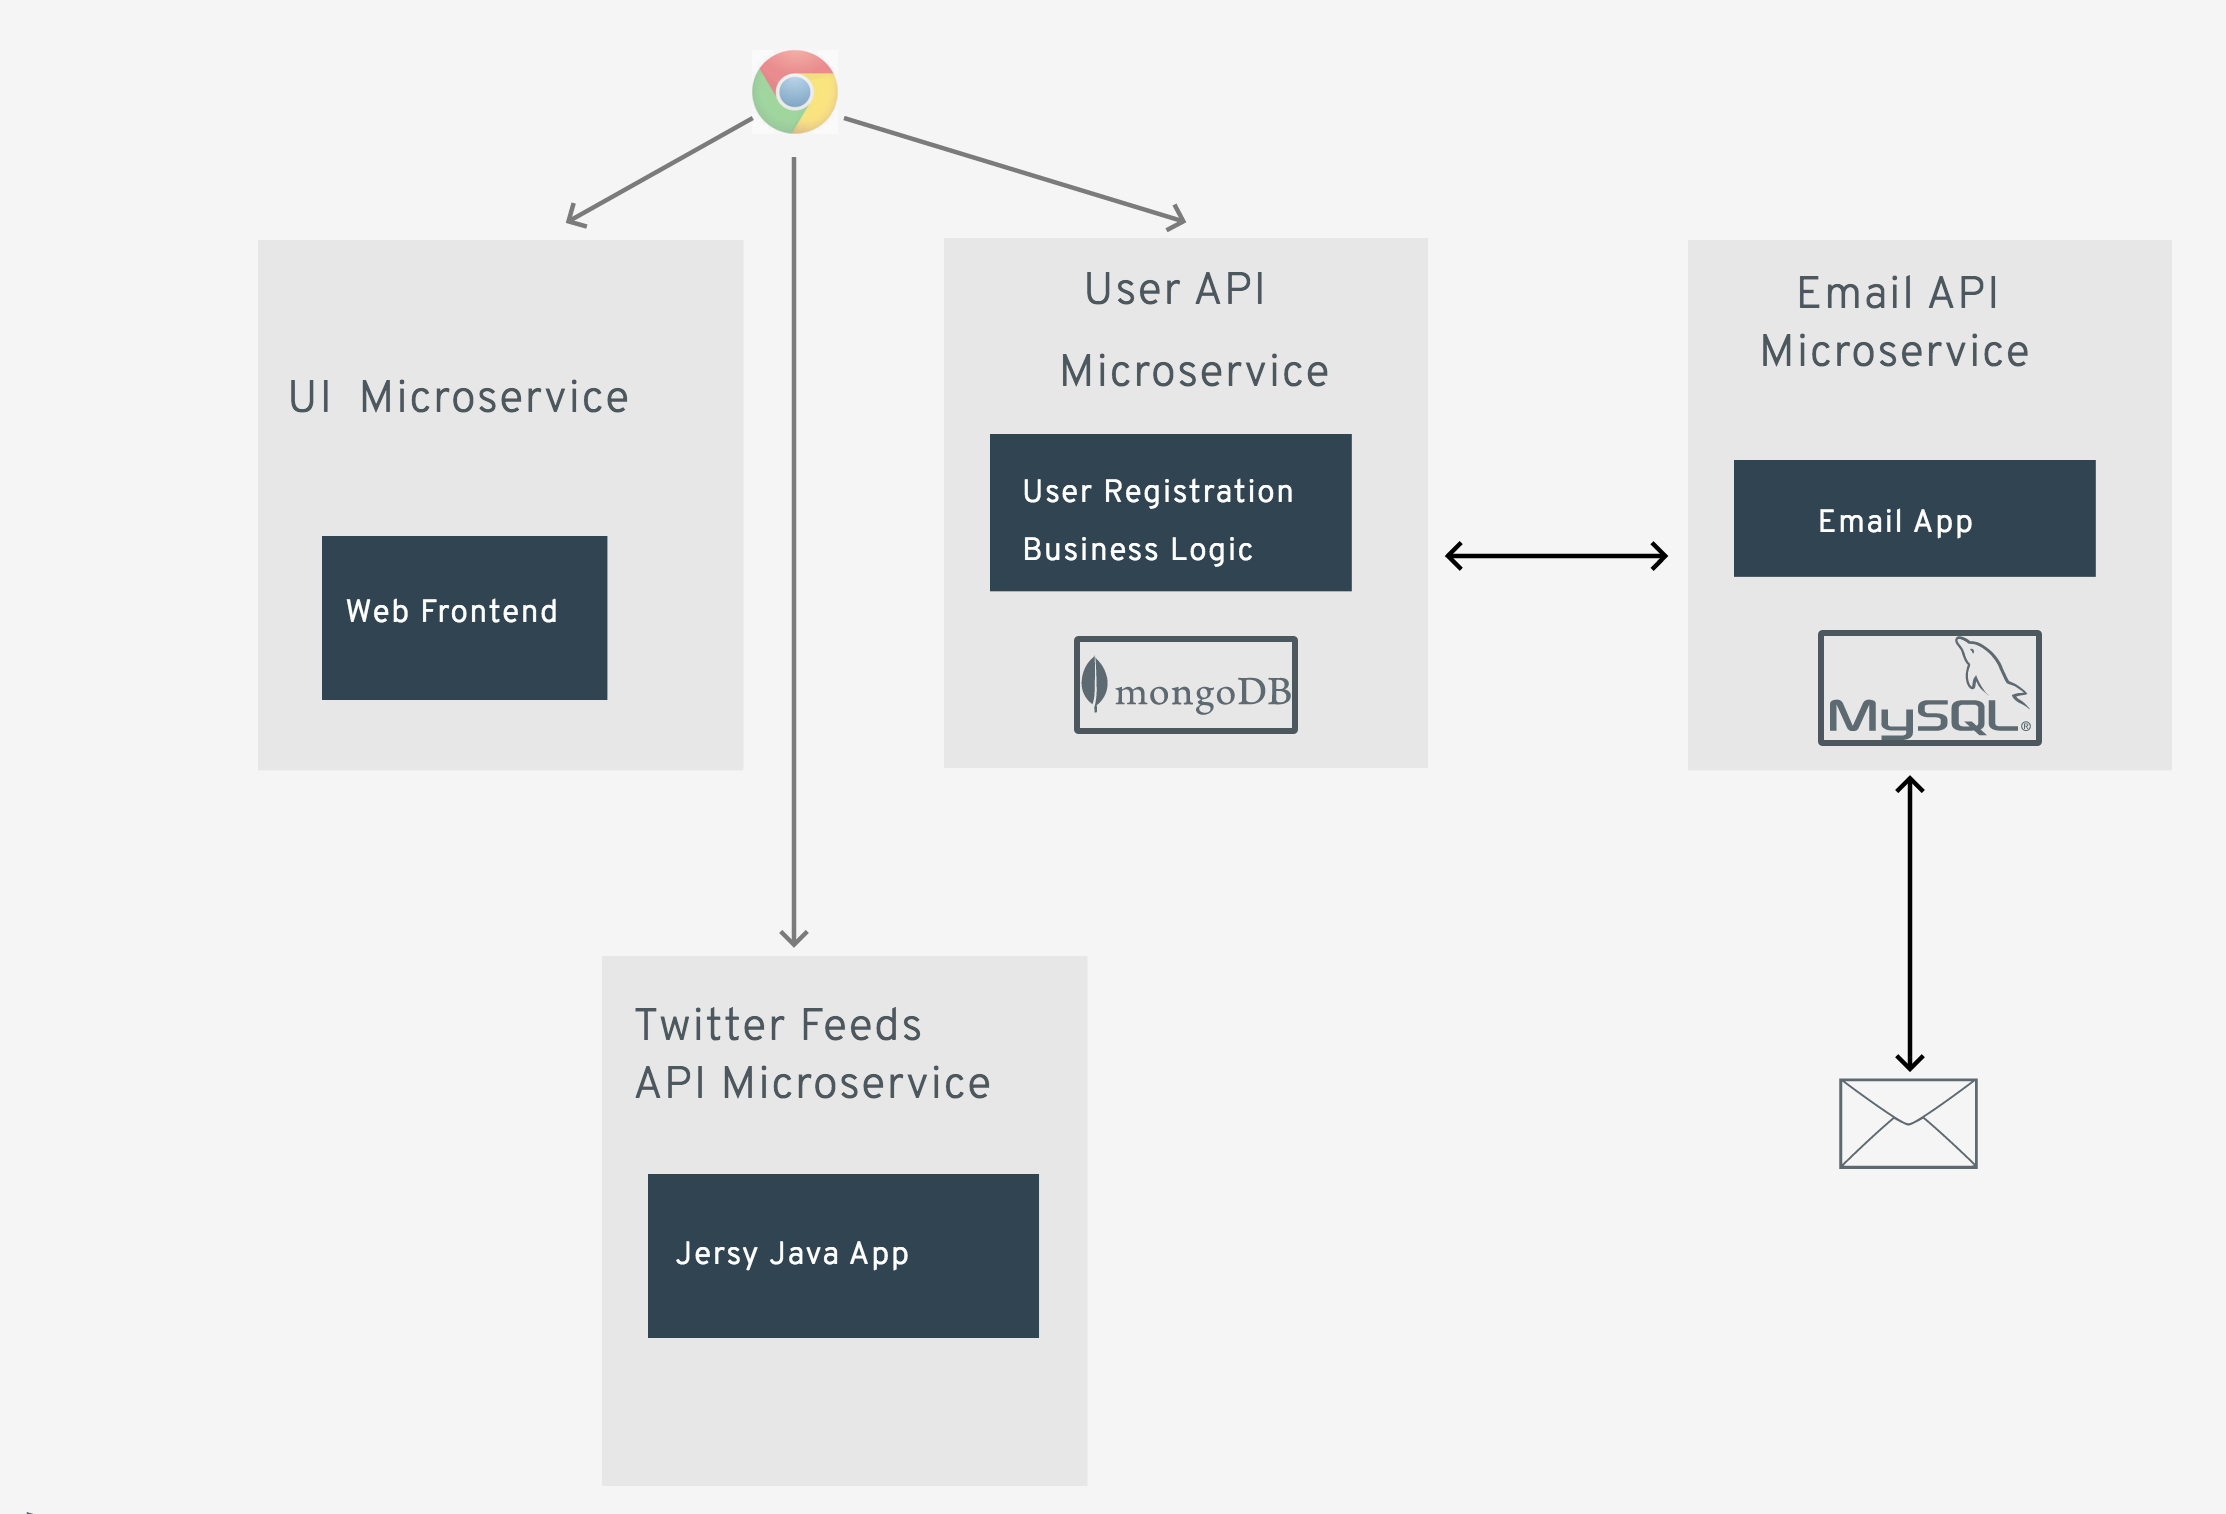
This repo demonstrates simple development and deployment of polyglot microservices on OpenShift V3. The diagram below is the architecture of the application that is made up of three sample micro services.
-
UserRegistration Backend: This microservices exposes REST APIs to register users, display user list etc. The code is written in NodeJS and it persists the data into a MongoDB database
-
UserRegistration: This is frontend UI built using PHP. The job of this microservice is confined to creating web pages.
-
Email Service: This is a generic email service that receives a request and sends an email. This code is written in Python. We will also add an email log (thinking of MySQL DB).
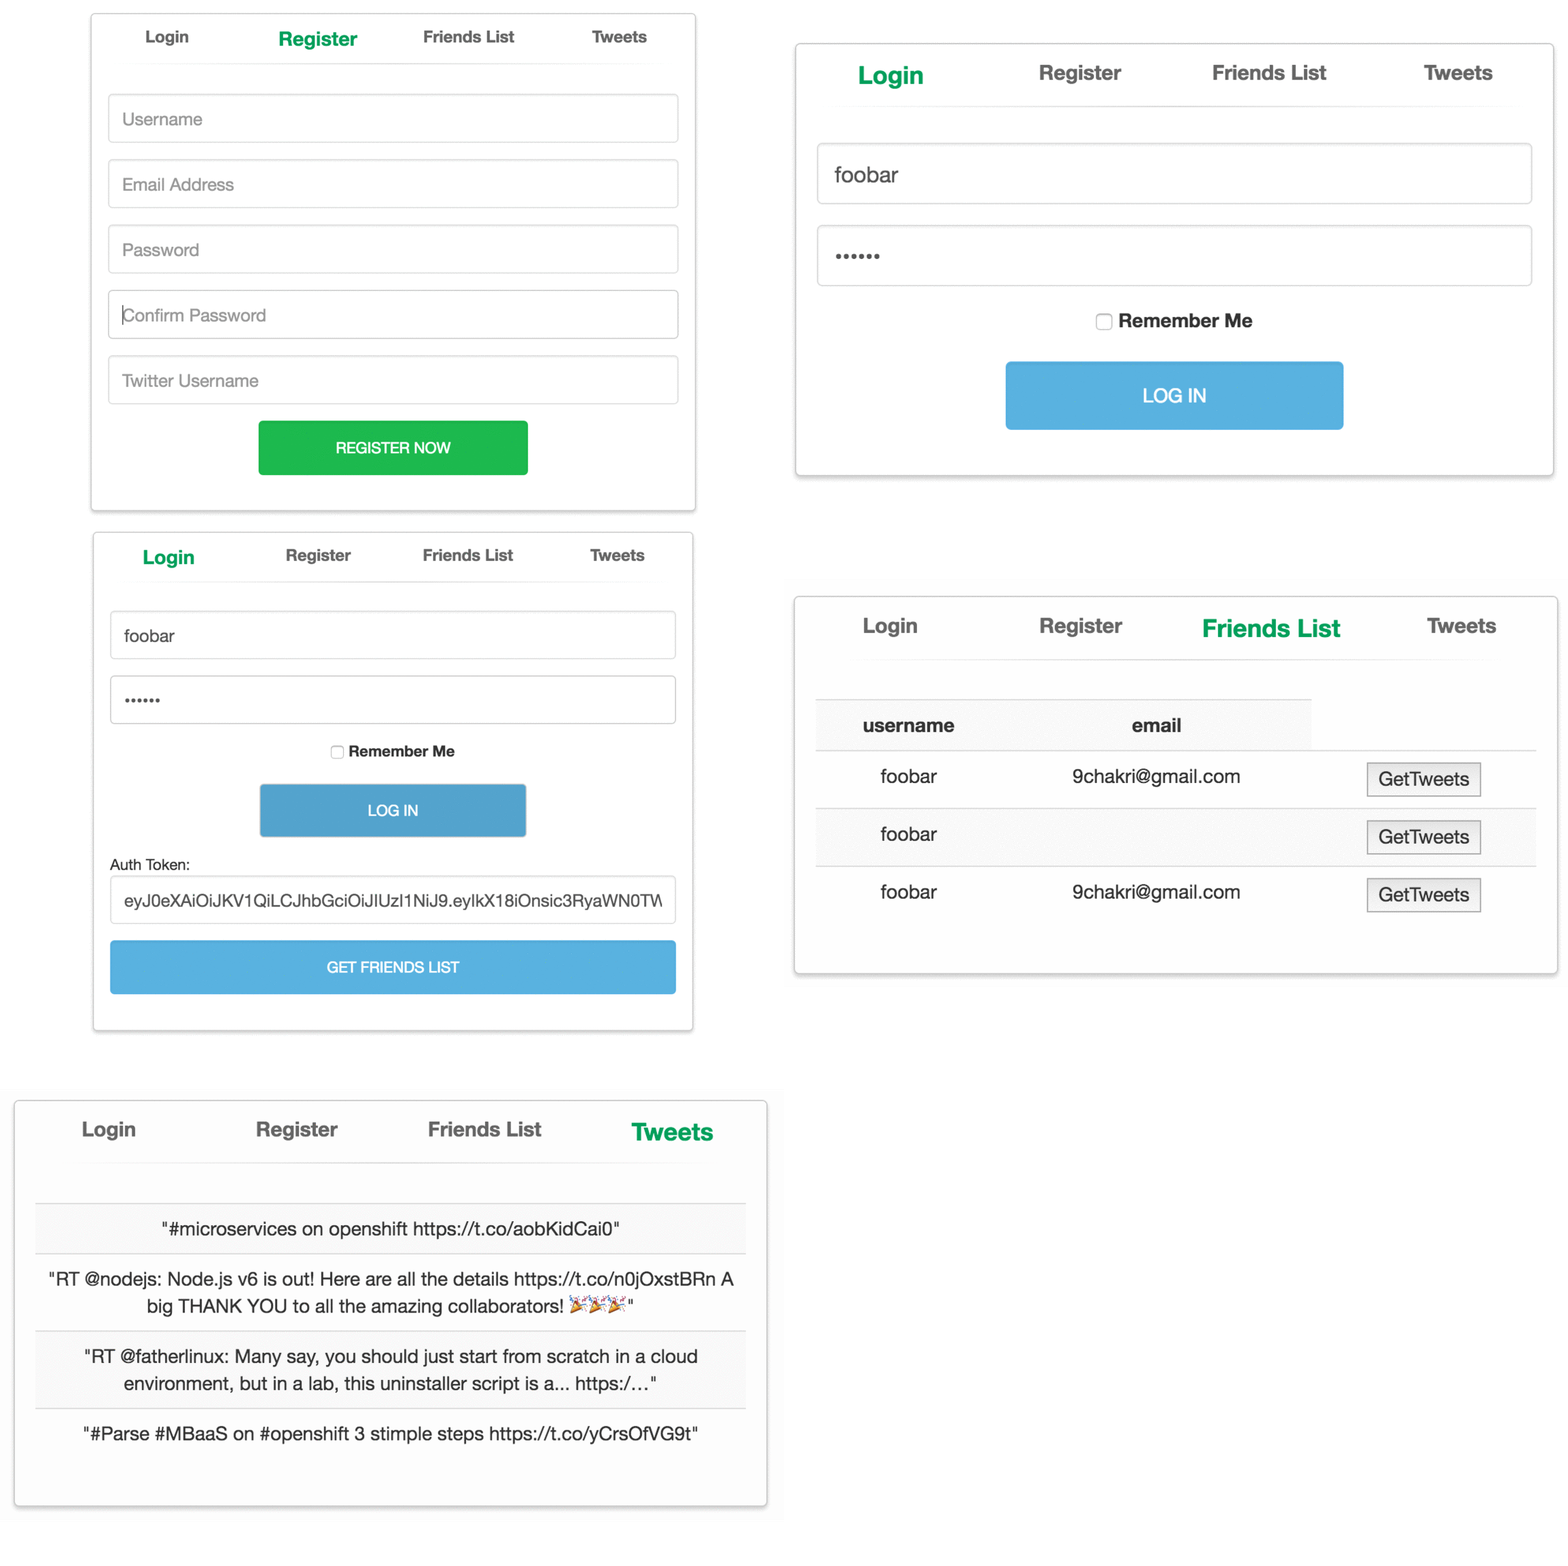
This is how it looks at the end
To setup openshift on your laptop using a Vagrant image use https://www.openshift.org/vm/ Assuming you have openshift installed on https://10.2.2.2:8443
Create an OpenShift project where these microservices will be created for development purposes. As an example we are calling it msdev.
oc login https://10.2.2.2:8443
oc new-project msdev
If you wish to change the code, feel free to fork the code and use your git links instead.
Let us create some environment variable that makes it easy to deal with some of the parameters we use in the subsequent commands
export OSE_DOMAIN=<<your apps domain name..ex: apps.osecloud.com>
export OSE_PROJECT=<<your openshift projectname. ex:msdev>
Ex:--
$ export OSE_DOMAIN=apps.10.2.2.2.xip.io
$ export OSE_PROJECT=msdev
Python application
The below command creates a new application for email service. This code is written in Python and emails are archived in mysql. This service receives the email request and sends out the email.
$ oc new-app -e MYSQL_USER='app_user',\
MYSQL_PASSWORD='password',\
MYSQL_DATABASE=microservices\
 registry.access.redhat.com/rhscl/mysql-56-rhel7 --name='mysql' -l microservice=emailsvc

$ oc deploy mysql --latest
Get into the mysql pod
$ sleep 10 # wait till the mysql is pod is created
$ oc rsh $(oc get pods | grep mysql | grep Running | awk '{print $1}')    # rsh will ssh into the mysql pod
$ mysql -u $MYSQL_USER -p$MYSQL_PASSWORD -h $HOSTNAME $MYSQL_DATABASE   ##inside the pod
Create schema and exit container
create table emails (from_add varchar(40), to_add varchar(40), subject varchar(40), body varchar(200), created_at date); $ exit # to exit from mysql prompt
$ exit # to exit from podoc new-app --context-dir='python-email-api' \
-e EMAIL_APPLICATION_DOMAIN=http://emailsvc:8080,\
MYSQL_USER='app_user',\
MYSQL_PASSWORD='password',\
MYSQL_DATABASE='microservices',\
MYSQL_SERVICE_HOST='MYSQL'\
https://github.com/prasenforu/microservice.git \
--name=emailsvc --image-stream='python:2.7' -l microservice=emailsvcAlthough we can expose this service using a URL, if we want this email service to be used by other applications over http using the command oc expose svc/emailsvc, we are not doing it here as we intend to use this as an internal service. You will see in the next section that the User Registration service will use the internal service name emailsvc to send emails.
For testing purpose use oc expose svc/emailsvc command then use following command to test email service.
In browser URL use:
http://emailsvc-microsrv.cloudapps.teg.com/email
In command line use:
curl -X POST -d '{"to":"[email protected]","msg":"test mail"}' -H "Content-Type: application/json" http://emailsvc-microsrv.cloudapps.teg.com/email
This service contains two components. It has a database that saves the user data for which we are using MongoDB. It has business logic layer that exposes REST APIs to register a user, get userslist etc. This part of the application is written in NodeJS. We can deploy this microservice using one of the following two approaches.
Approach
- Create a MongoDB database and expose it as an internal service
- Create a User Registration Service that talks to the database deployed in the previous step. We are going to name this as "userregsvc".
$ oc new-app -e MONGODB_USER=mongouser,MONGODB_PASSWORD=password,\
MONGODB_DATABASE=userdb,MONGODB_ADMIN_PASSWORD=password \
  registry.access.redhat.com/rhscl/mongodb-26-rhel7 \
--name mongodb -l microservice=userregsvc
$ oc deploy mongodb --latest
Create the User Registration Service and expose the service so that we can use a URL to make calls to the REST APIs exposed by this service
oc new-app -e EMAIL_APPLICATION_DOMAIN=http://emailsvc:8080,\
MONGODB_DATABASE=userdb,MONGODB_PASSWORD=password,\
MONGODB_USER=mongouser,DATABASE_SERVICE_NAME=mongodb \
--context-dir='nodejs-users-api' \
https://github.com/prasenforu/microservice.git \
--name='userregsvc' -l microservice=userregsvc

oc expose svc/userregsvc
Note that we are using internal emailsvc as the EMAIL_APPLICATION_DOMAIN
(Java application)
This microservice is a java application which takes twitter username as input and outputs recent tweets of the user.
oc import-image --from=registry.access.redhat.com/jboss-webserver-3/webserver30-tomcat8-openshift tomcat8 --confirm

oc new-app \
https://github.com/prasenforu/microservice.git \
--context-dir='java-twitter-feed-api' \
--image-stream='tomcat8'  \
--name='twitter-api' -l microservice=twittersvc

oc expose svc/twitter-api
For Testing use following URL
curl http://twitter-api-microsrv.cloudapps.teg.com/simple-service-webapp/api/tweets?name=debianmaster curl http://twitter-api-microsrv.cloudapps.teg.com/simple-service-webapp/api/tweets?name=potus curl http://twitter-api-microsrv.cloudapps.teg.com/simple-service-webapp/api/tweets?name=BarackObama
(php application)
This microservice produces html+javascript to run in a browser and makes ajax calls to the backend User Registration service using REST APIs. Note that we are setting an environment variable for userregsvc to access the backend using REST APIs.
$ oc new-app -e USER_REG_SVC="http://userregsvc-$OSE_PROJECT.$OSE_DOMAIN" \
-e TWITTER_FEED_SVC="http://twitter-api-$OSE_PROJECT.$OSE_DOMAIN" \
--context-dir='php-ui' \
https://github.com/prasenforu/microservice.git \
--name='userreg' \
-l microservice=userreg

$ oc expose svc/userreg
The service exposed in the above step is our application front end. You can find the URL by running oc get route
Visit http://userreg-msdev.apps.10.2.2.2.xip.io/ to see the php frontend.
Suppose you have a huge traffic and you want to scale front end
oc scale dc/userreg --replicas=4
