Find the guides, samples, and references you need to use the platform, generate context, and build applications on the Discripto Platform.
Before we jump ahead we assume you hav already created an Discripto Account. If you haven't please visit our webpage to create an account. Access to the API is automatically allowed with your signup credentials, no need for API keys.
We've put together some examples on how to call the API using the a CLI (command line interface),an API client like postman and python though any other programming languge would work too. To begin calling the API, you must signup for an account through the website to get access.
Simplest way to test our API is calling through a CLI. Prerequisites:
- You must have an account
- A computer with internet access
To get a JWT access token, you have to first make a login request with your signup credentials. to make a cURL request, copy and paste or type:
curl --request POST \
  --url https://discripto.hng.tech/api1/api/v1/login \
  --header 'Content-Type: application/json' \
  --data '{
	"email": "[email protected]",
	"password": "password"
}'
replace [email protected] with your email and password with your password.
sample response:
{
  "status": "success",
  "code": 200,
  "message": "User login successful",
  "data": {
    "Username": "johndoe",
    "FirstName": "John",
    "LastName": "Doe",
    "Email": "[email protected]",
    "Token": "eyJhbGciOiJIUzI1NiIsInR5cCI6IkpXVCJ9.eyJhdXRob3JpemVkIjp0cnVlLCJleHAiOjE2NjkyMjc2MDEsImlkIjoiT2JqZWN0SUQoXCI2MzdkMTdjOTQxMTg5ZmRjNmJiODkwZWVcIikifQ.sTzq6C2B86w94auIjqjSveJ55E6G8Iwa-E564gUdjrg",
    "TokenType": "bearer",
    "ApiCallCount": 8
  }
}
copy the "Token" value, that is the JWT access token we'll be using.
To make the cURL request, copy and paste or type:
curl --request POST \
  --url https://discripto.hng.tech/api1/api/v1/mine-service/url \
  --header 'Content-Type: application/json' \
  --data '{
	"url": "any image url here"
}'
Assuming the url provided links to the image below.
the sample response:{
"status": "success",
"code": 201,
"message": "mine image successful",
"data": {
"image_name": "elephants.png",
"image_path": "https://mined-pictures.s3.amazonaws.com/9d674181d53ac16571d.png",
"text_content": "A group of elephants eating grass",
"date_created": "2022-11-23T17:20:51.002216449Z",
"date_modified": "2022-11-23T17:20:51.002216449Z"
}
}to make the cURL request, copy and paste or type:
curl --request POST \
  --url https://discripto.hng.tech/api1/api/v1/mine-service/upload \
  --header 'Authorization: Bearer eyJhbGciOiJIUzI1NiIsInR5cCI6IkpXVCJ9.eyJhdXRob3JpemVkIjp0cnVlLCJleHAiOjE2NjkyMjc2MDEsImlkIjoiT2JqZWN0SUQoXCI2MzdkMTdjOTQxMTg5ZmRjNmJiODkwZWVcIikifQ.sTzq6C2B86w94auIjqjSveJ55E6G8Iwa-E564gUdjrg' \
  --header 'Content-Type: multipart/form-data' \
  --header 'content-type: multipart/form-data; boundary=---011000010111000001101001' \
  --form image=elephants.jpg
Assuming elephants.jpg is the same image as above,
the sample response:
{
  "status": "success",
  "code": 201,
  "message": "mine image successful",
  "data": {
    "image_name": "elephants.jpg",
    "image_path": "https://mined-pictures.s3.amazonaws.com/981d53ac1d67416571d.png",
    "text_content": "A group of elephants eating grass",
    "date_created": "2022-11-23T17:20:51.002216449Z",
    "date_modified": "2022-11-23T17:20:51.002216449Z"
  }
}-
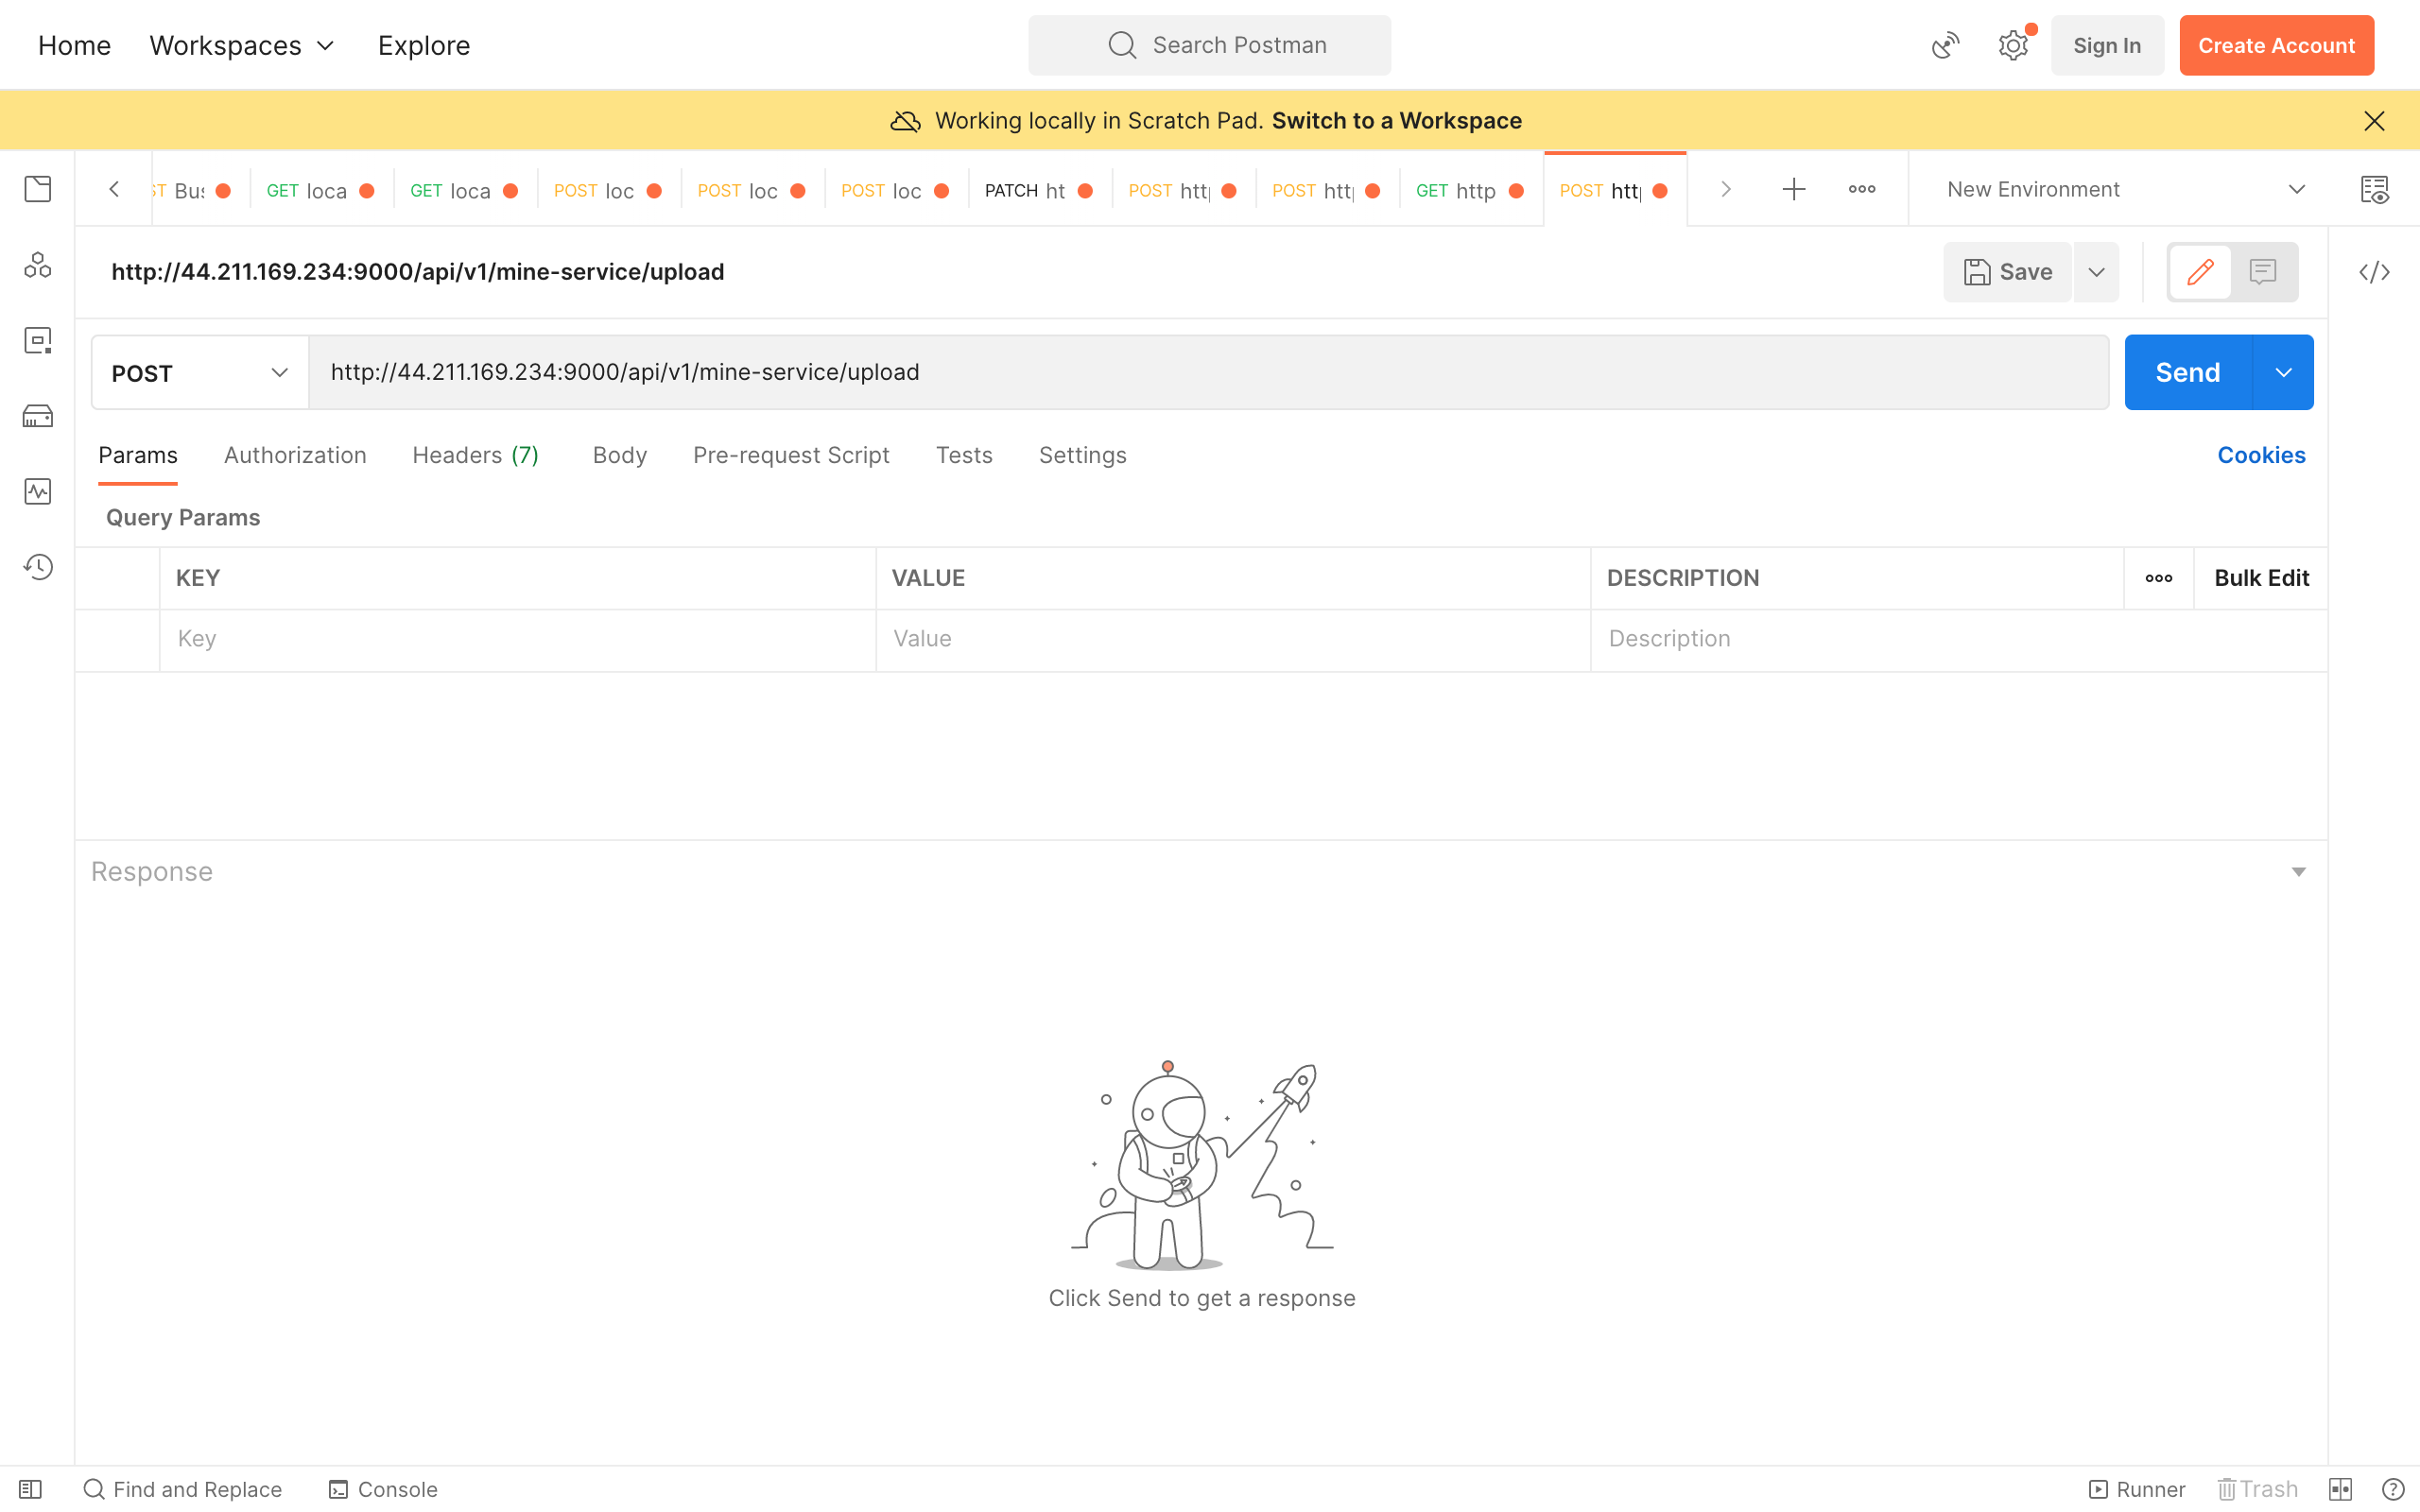
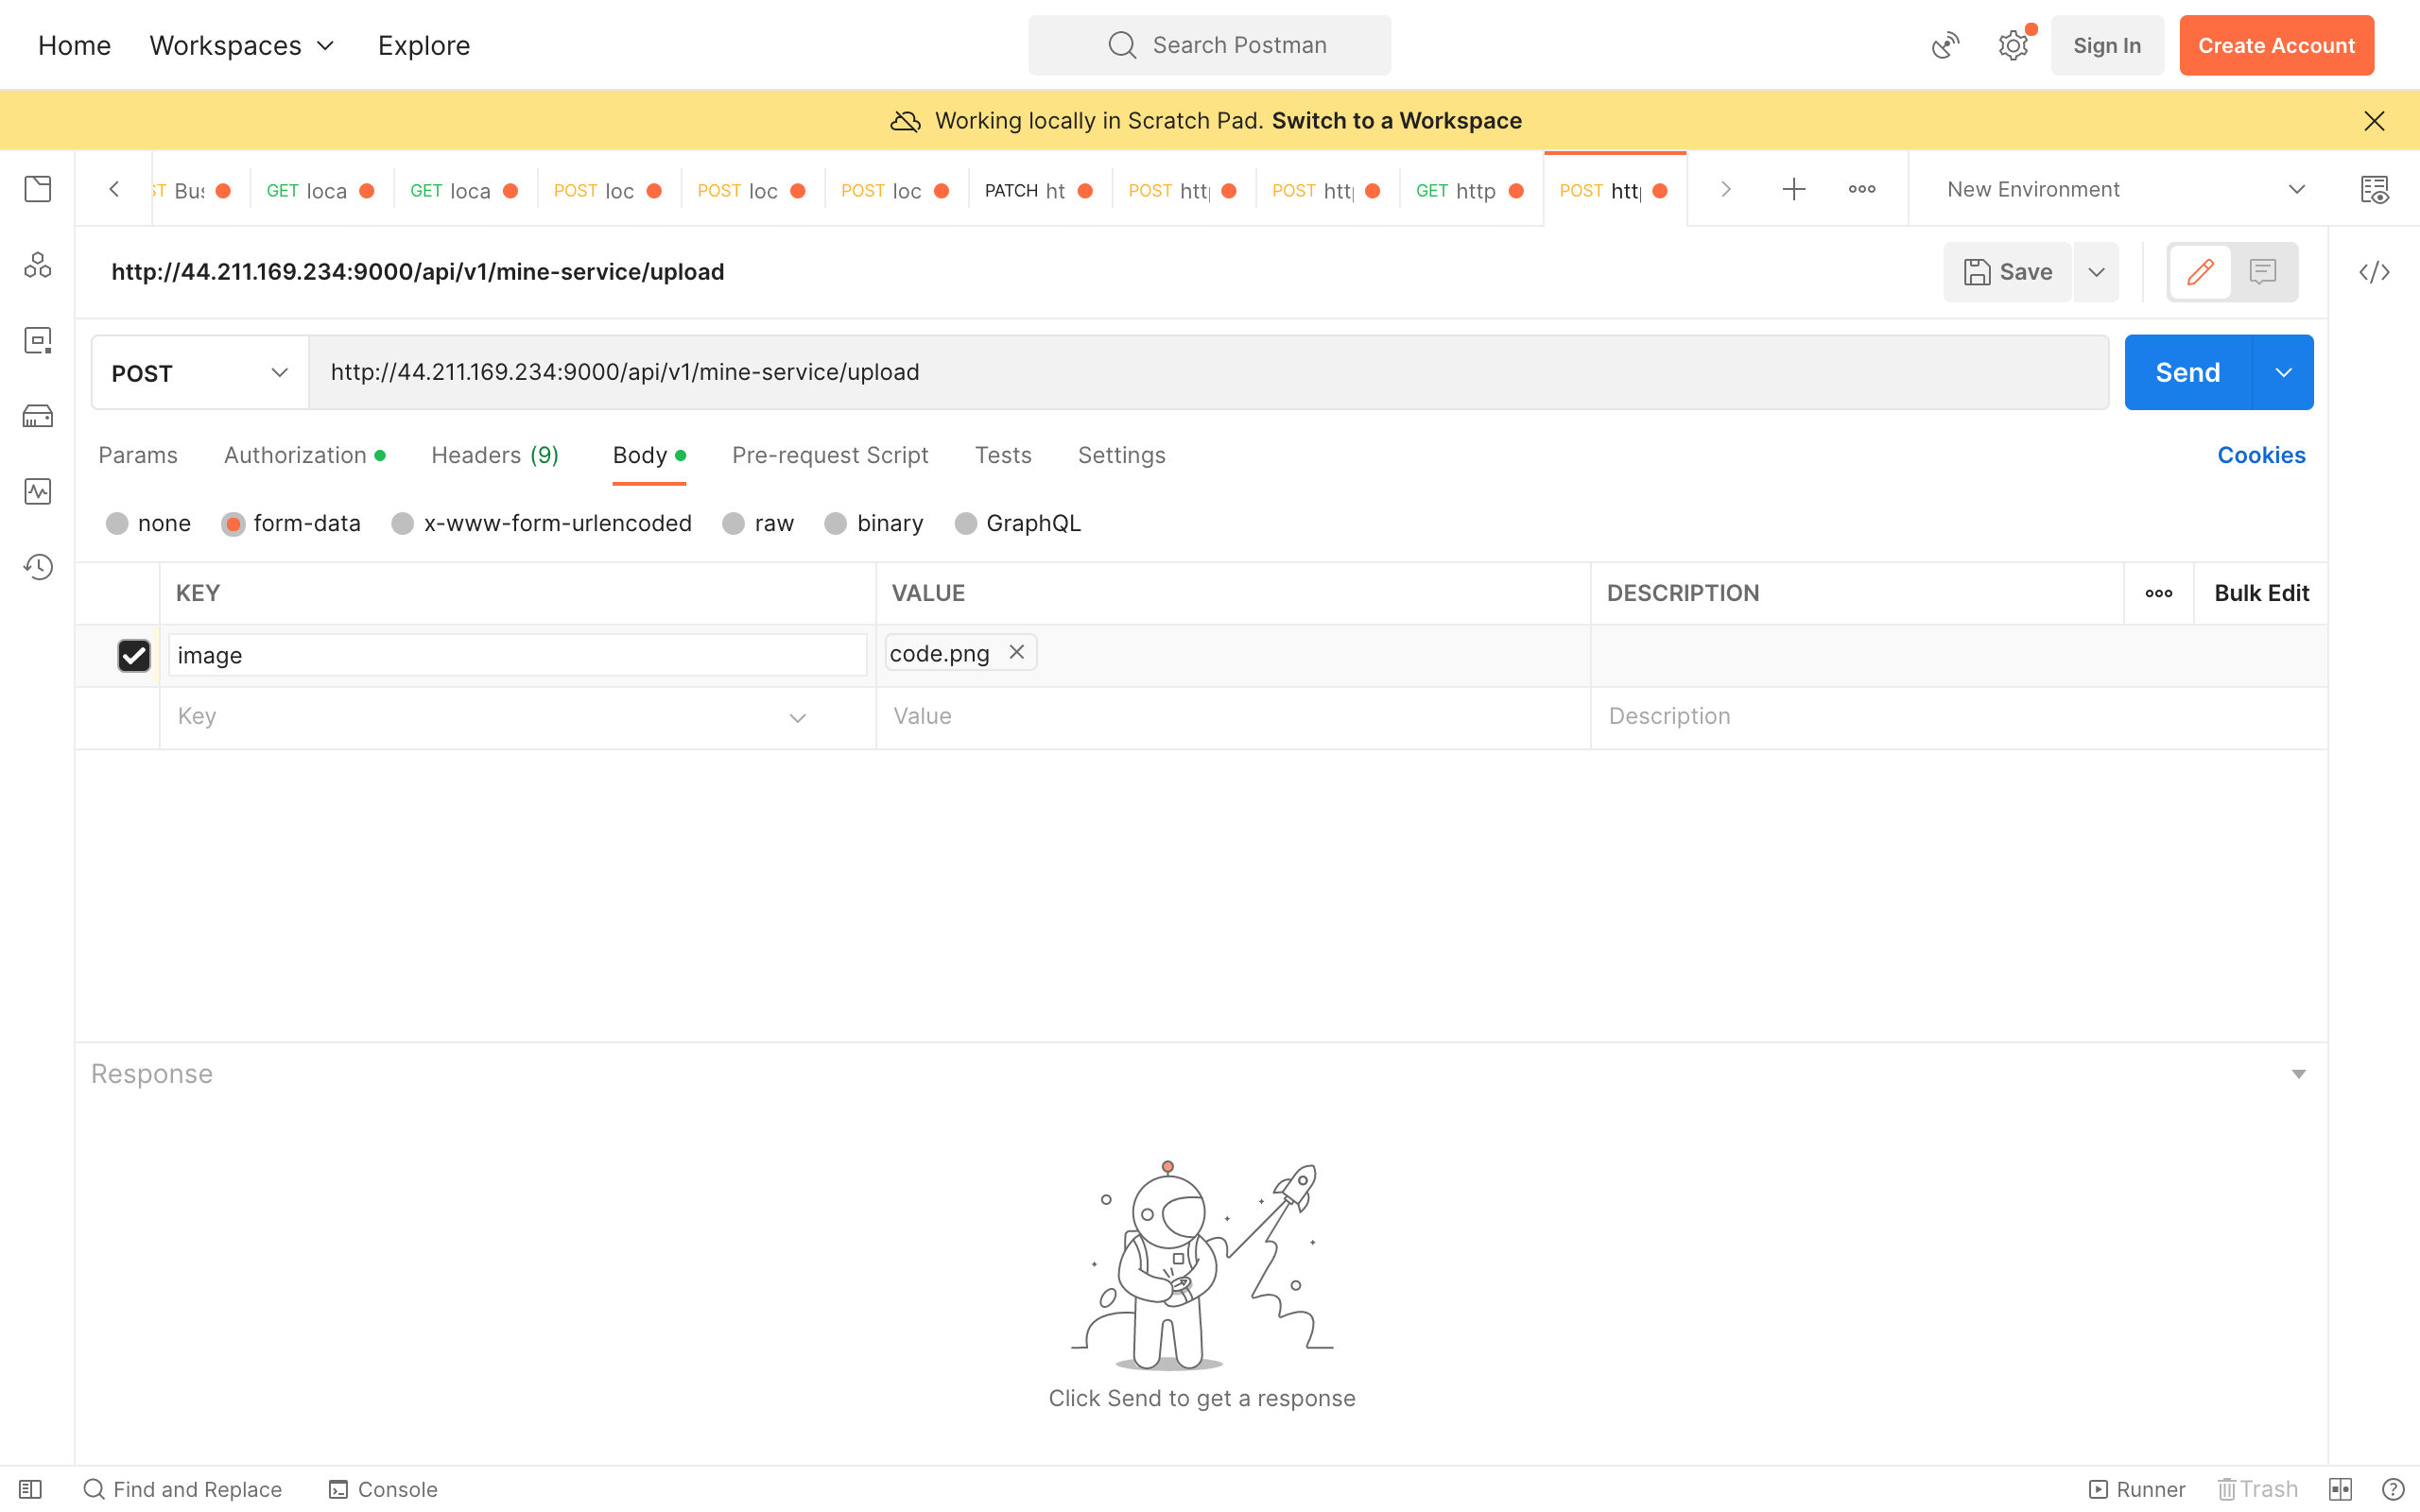
Create a new request with our the url
https://discripto.hng.tech/api1/api/v1/mine-service/upload. -
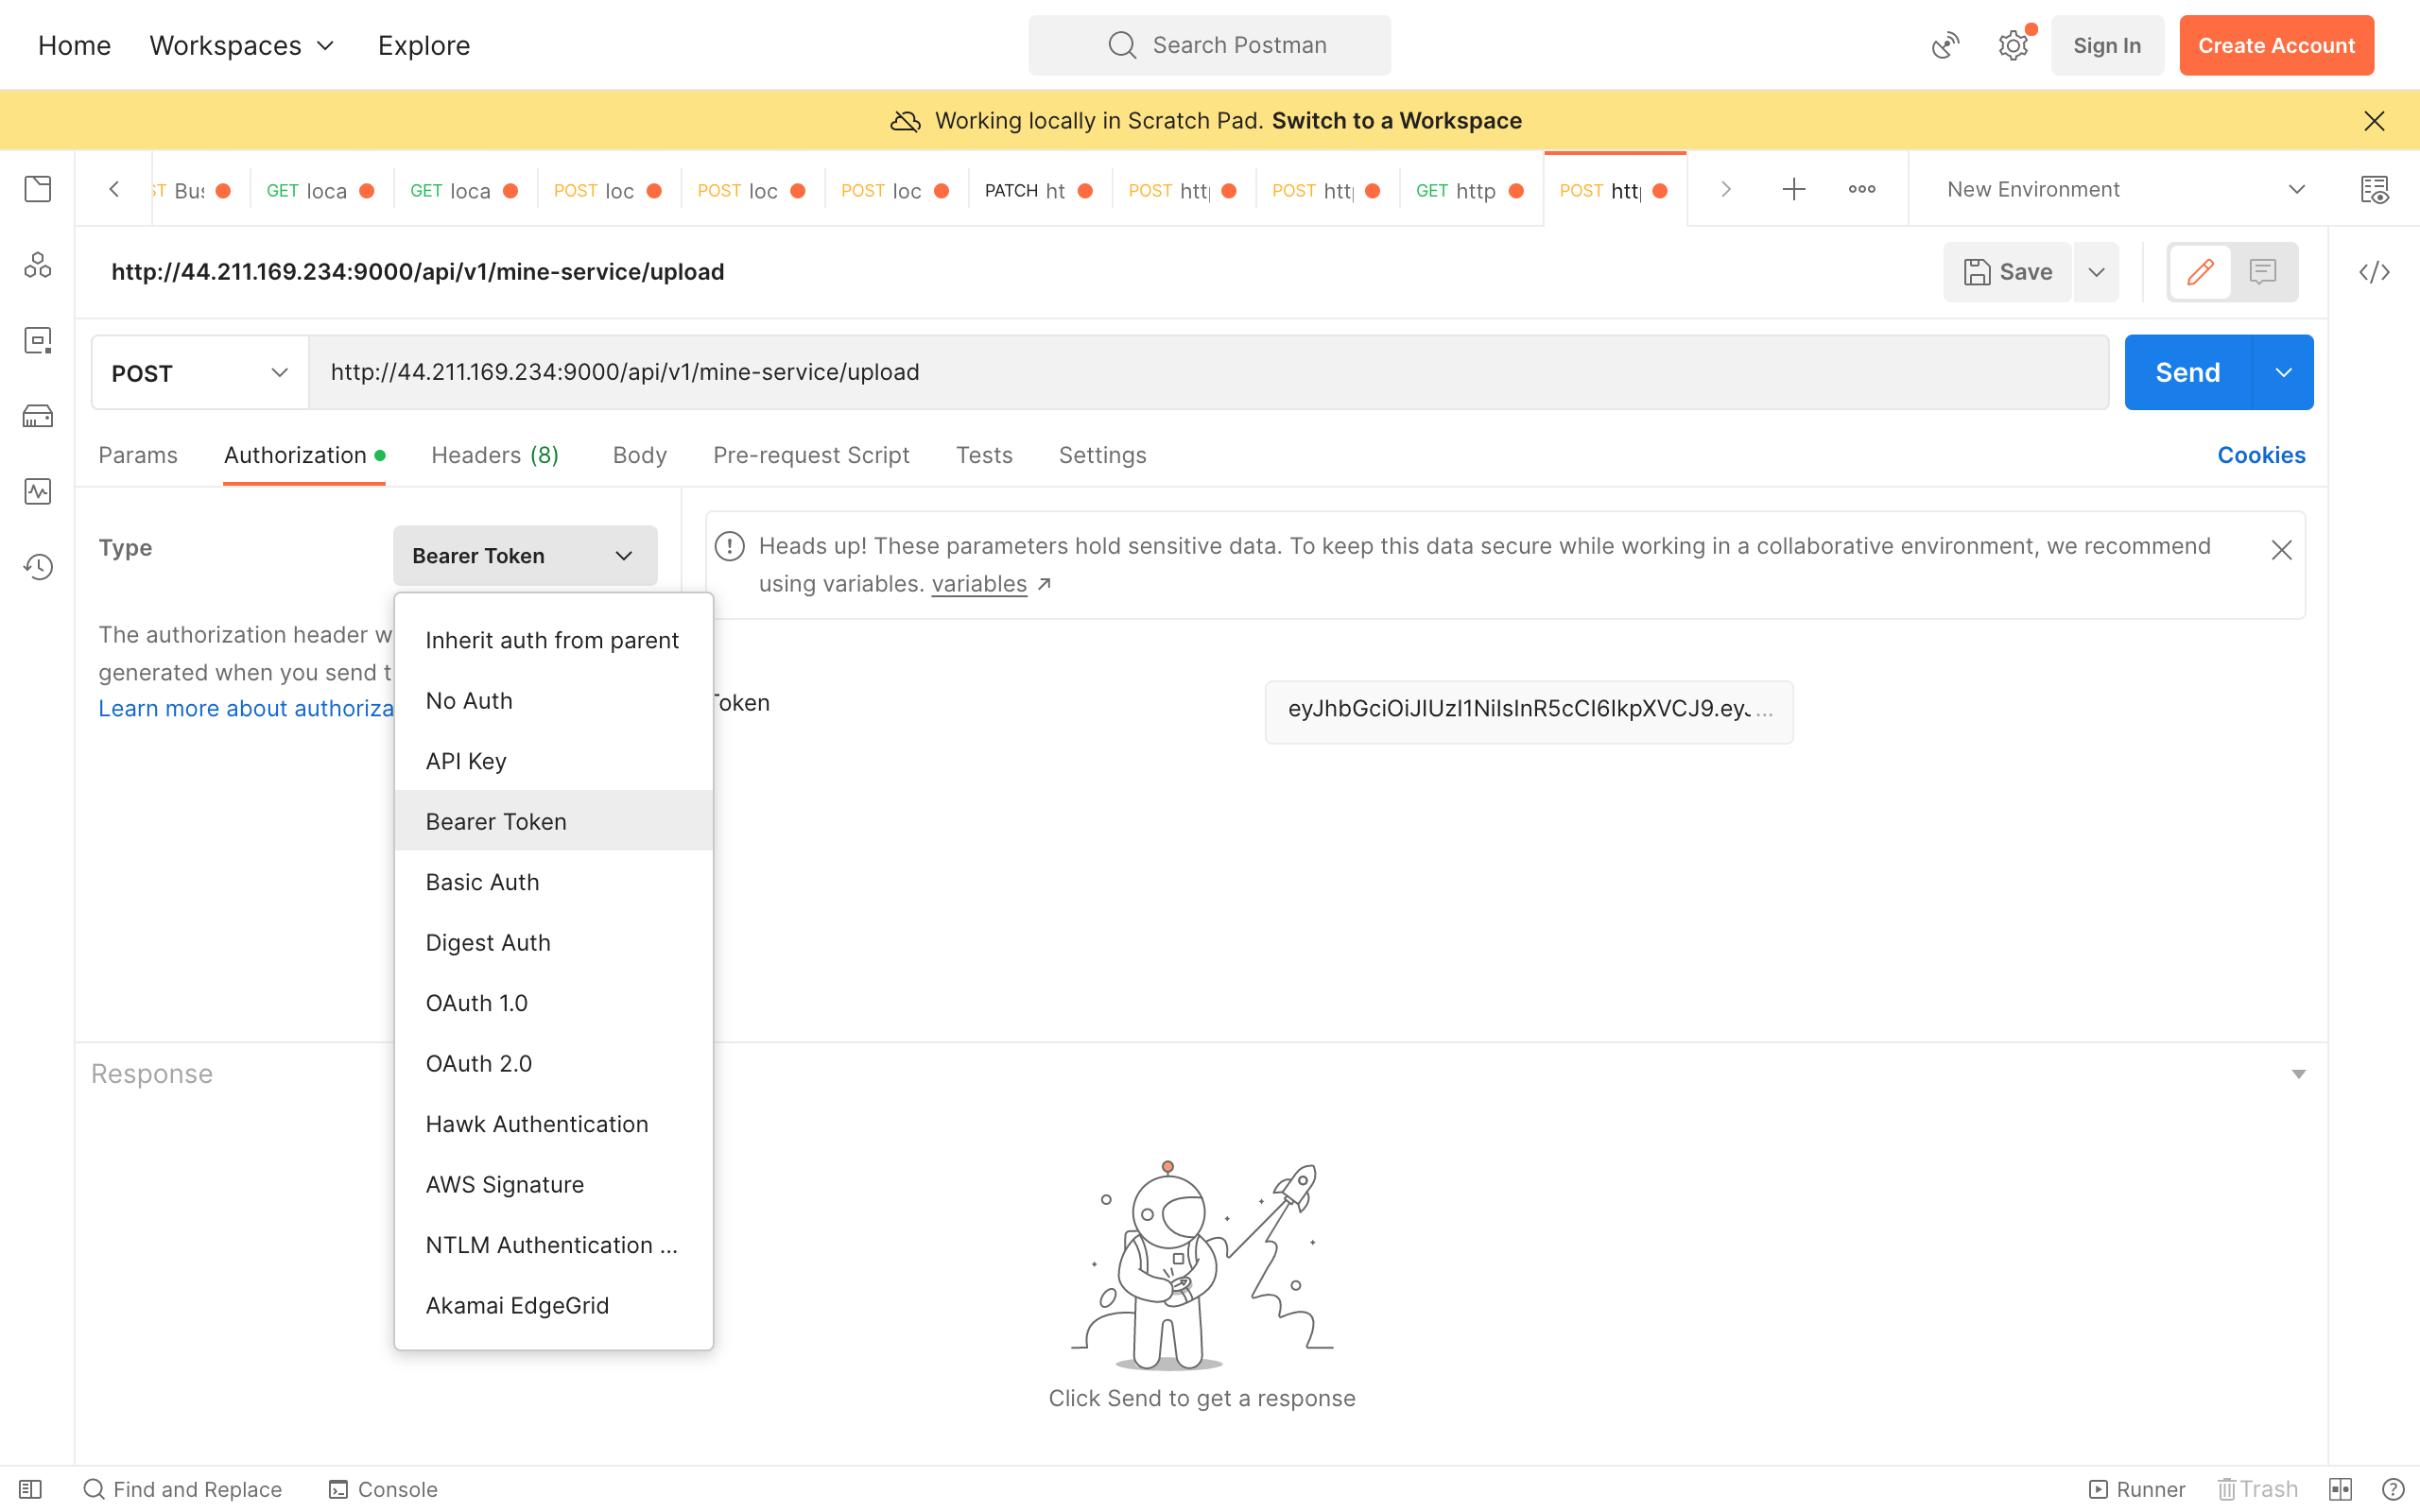
Set the authorization headers (this token is used to verify your identity. You can get the token at insert website here) []
-
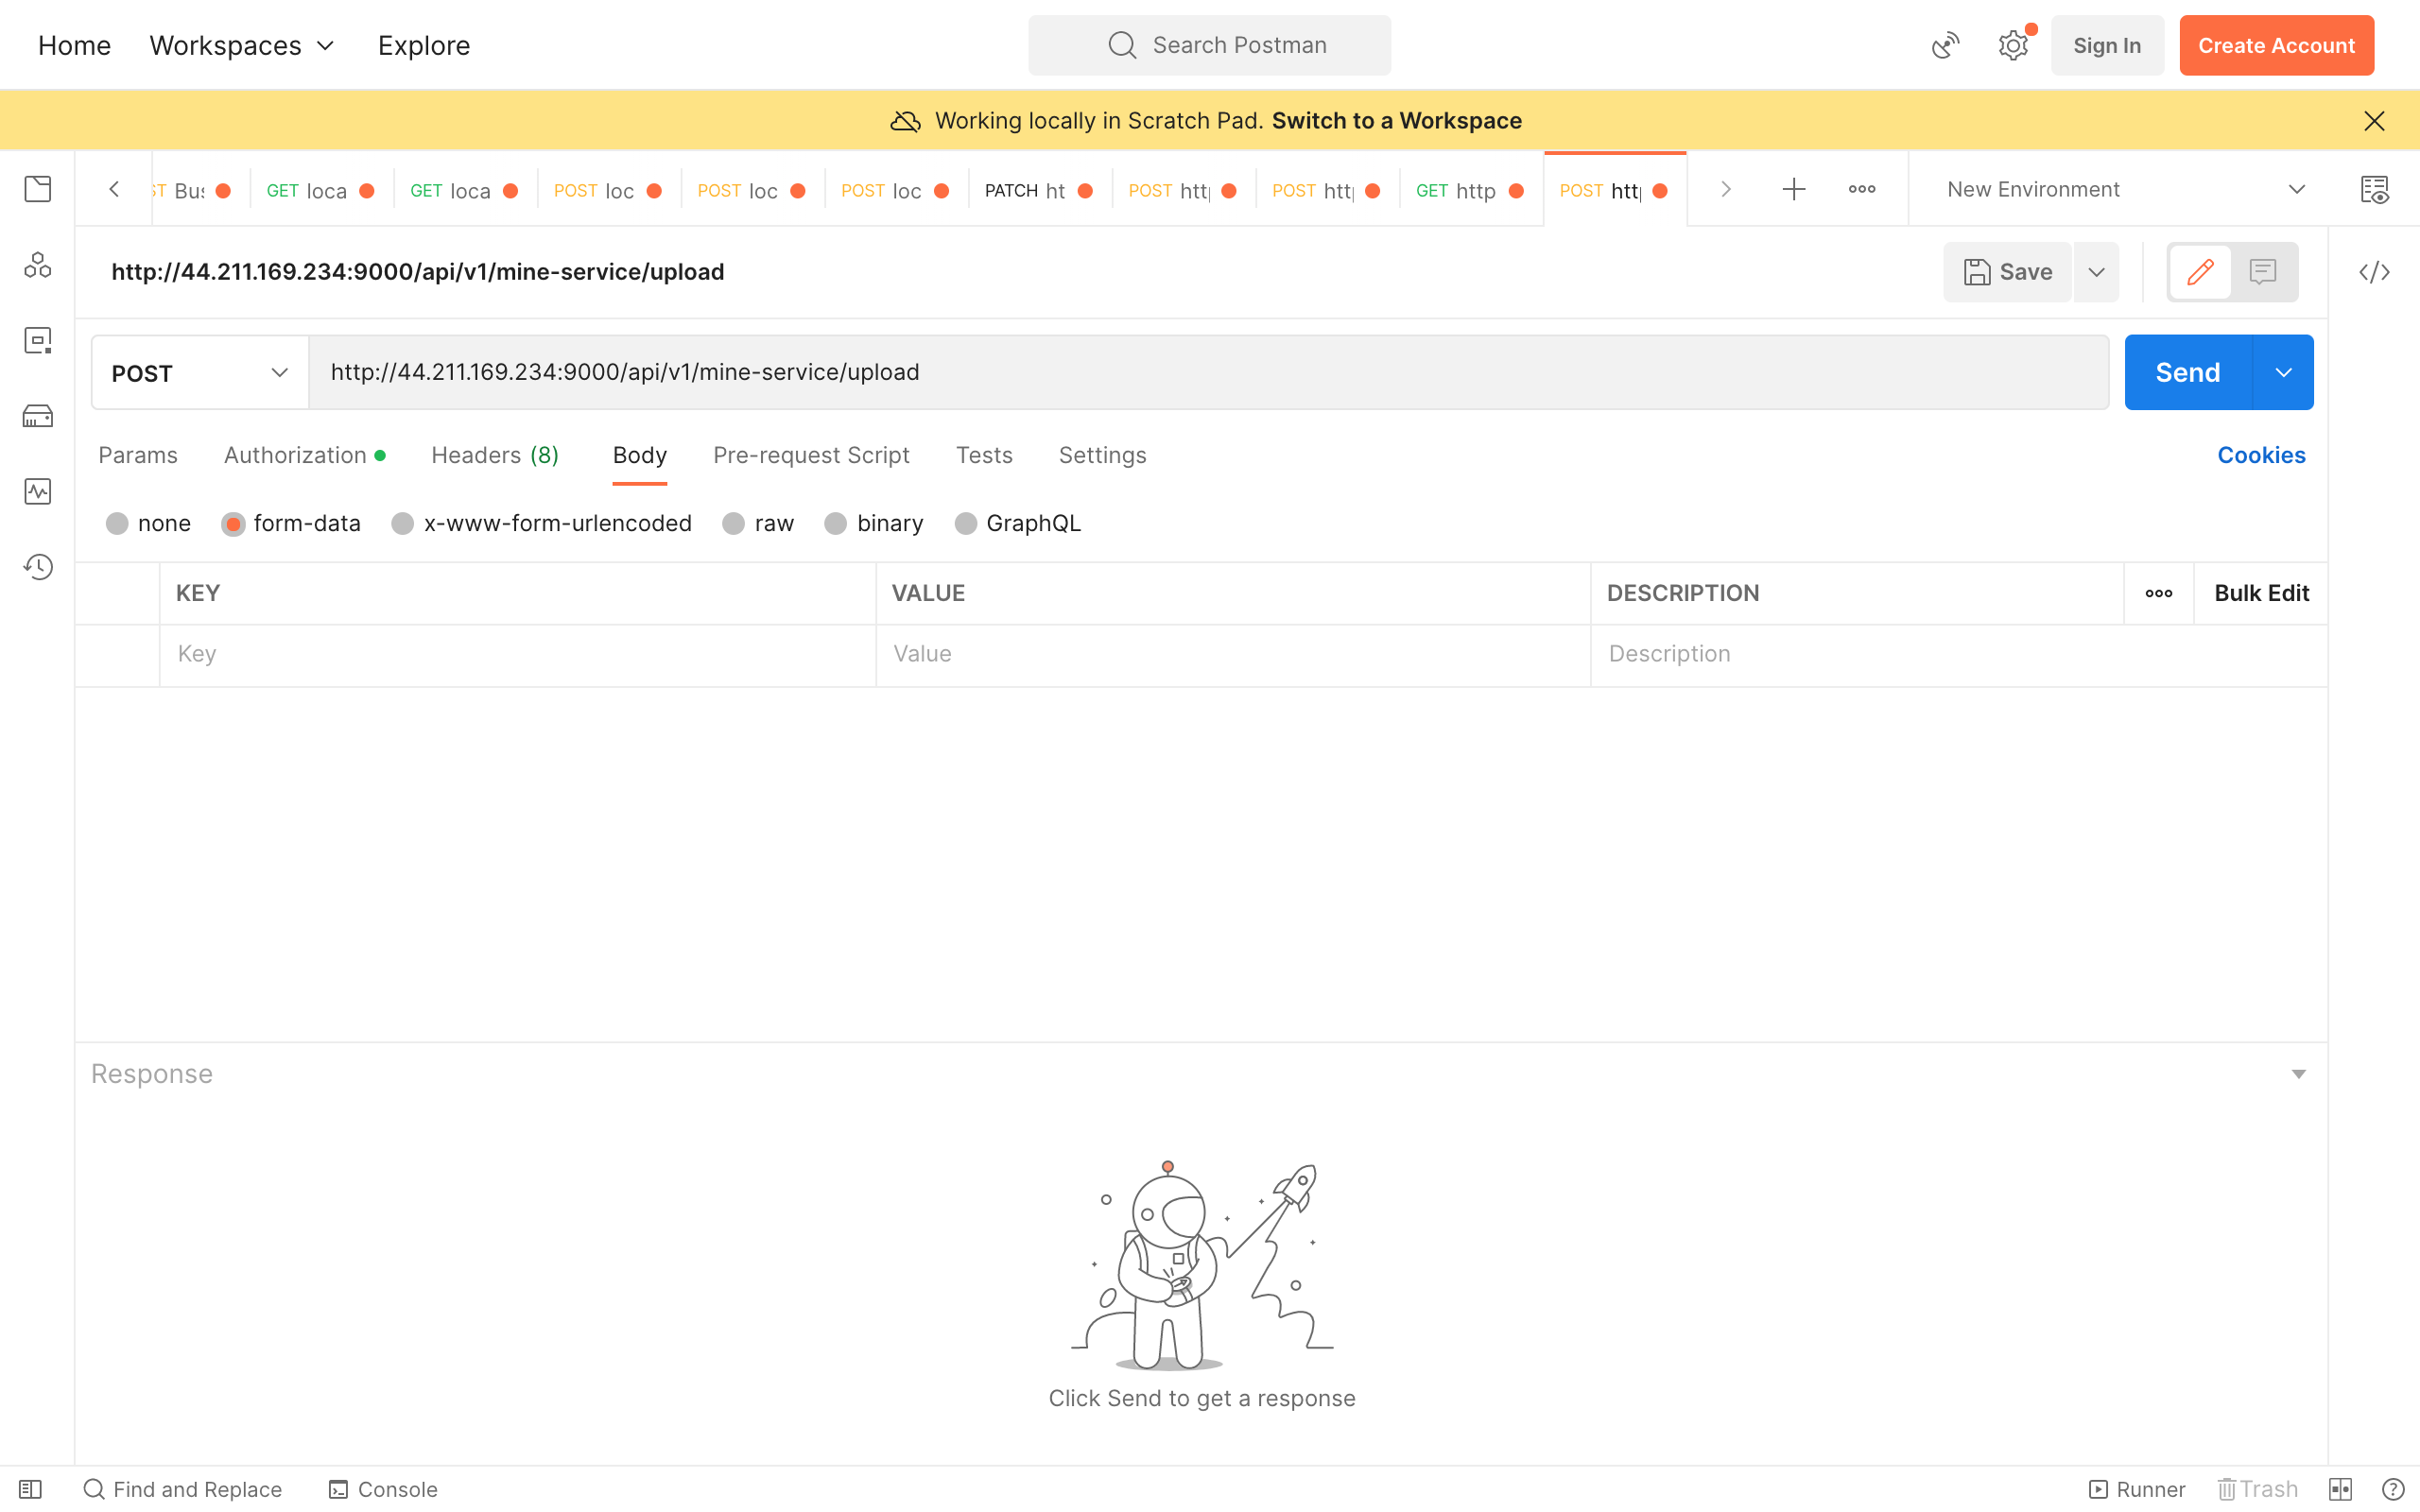
set the body as formdata
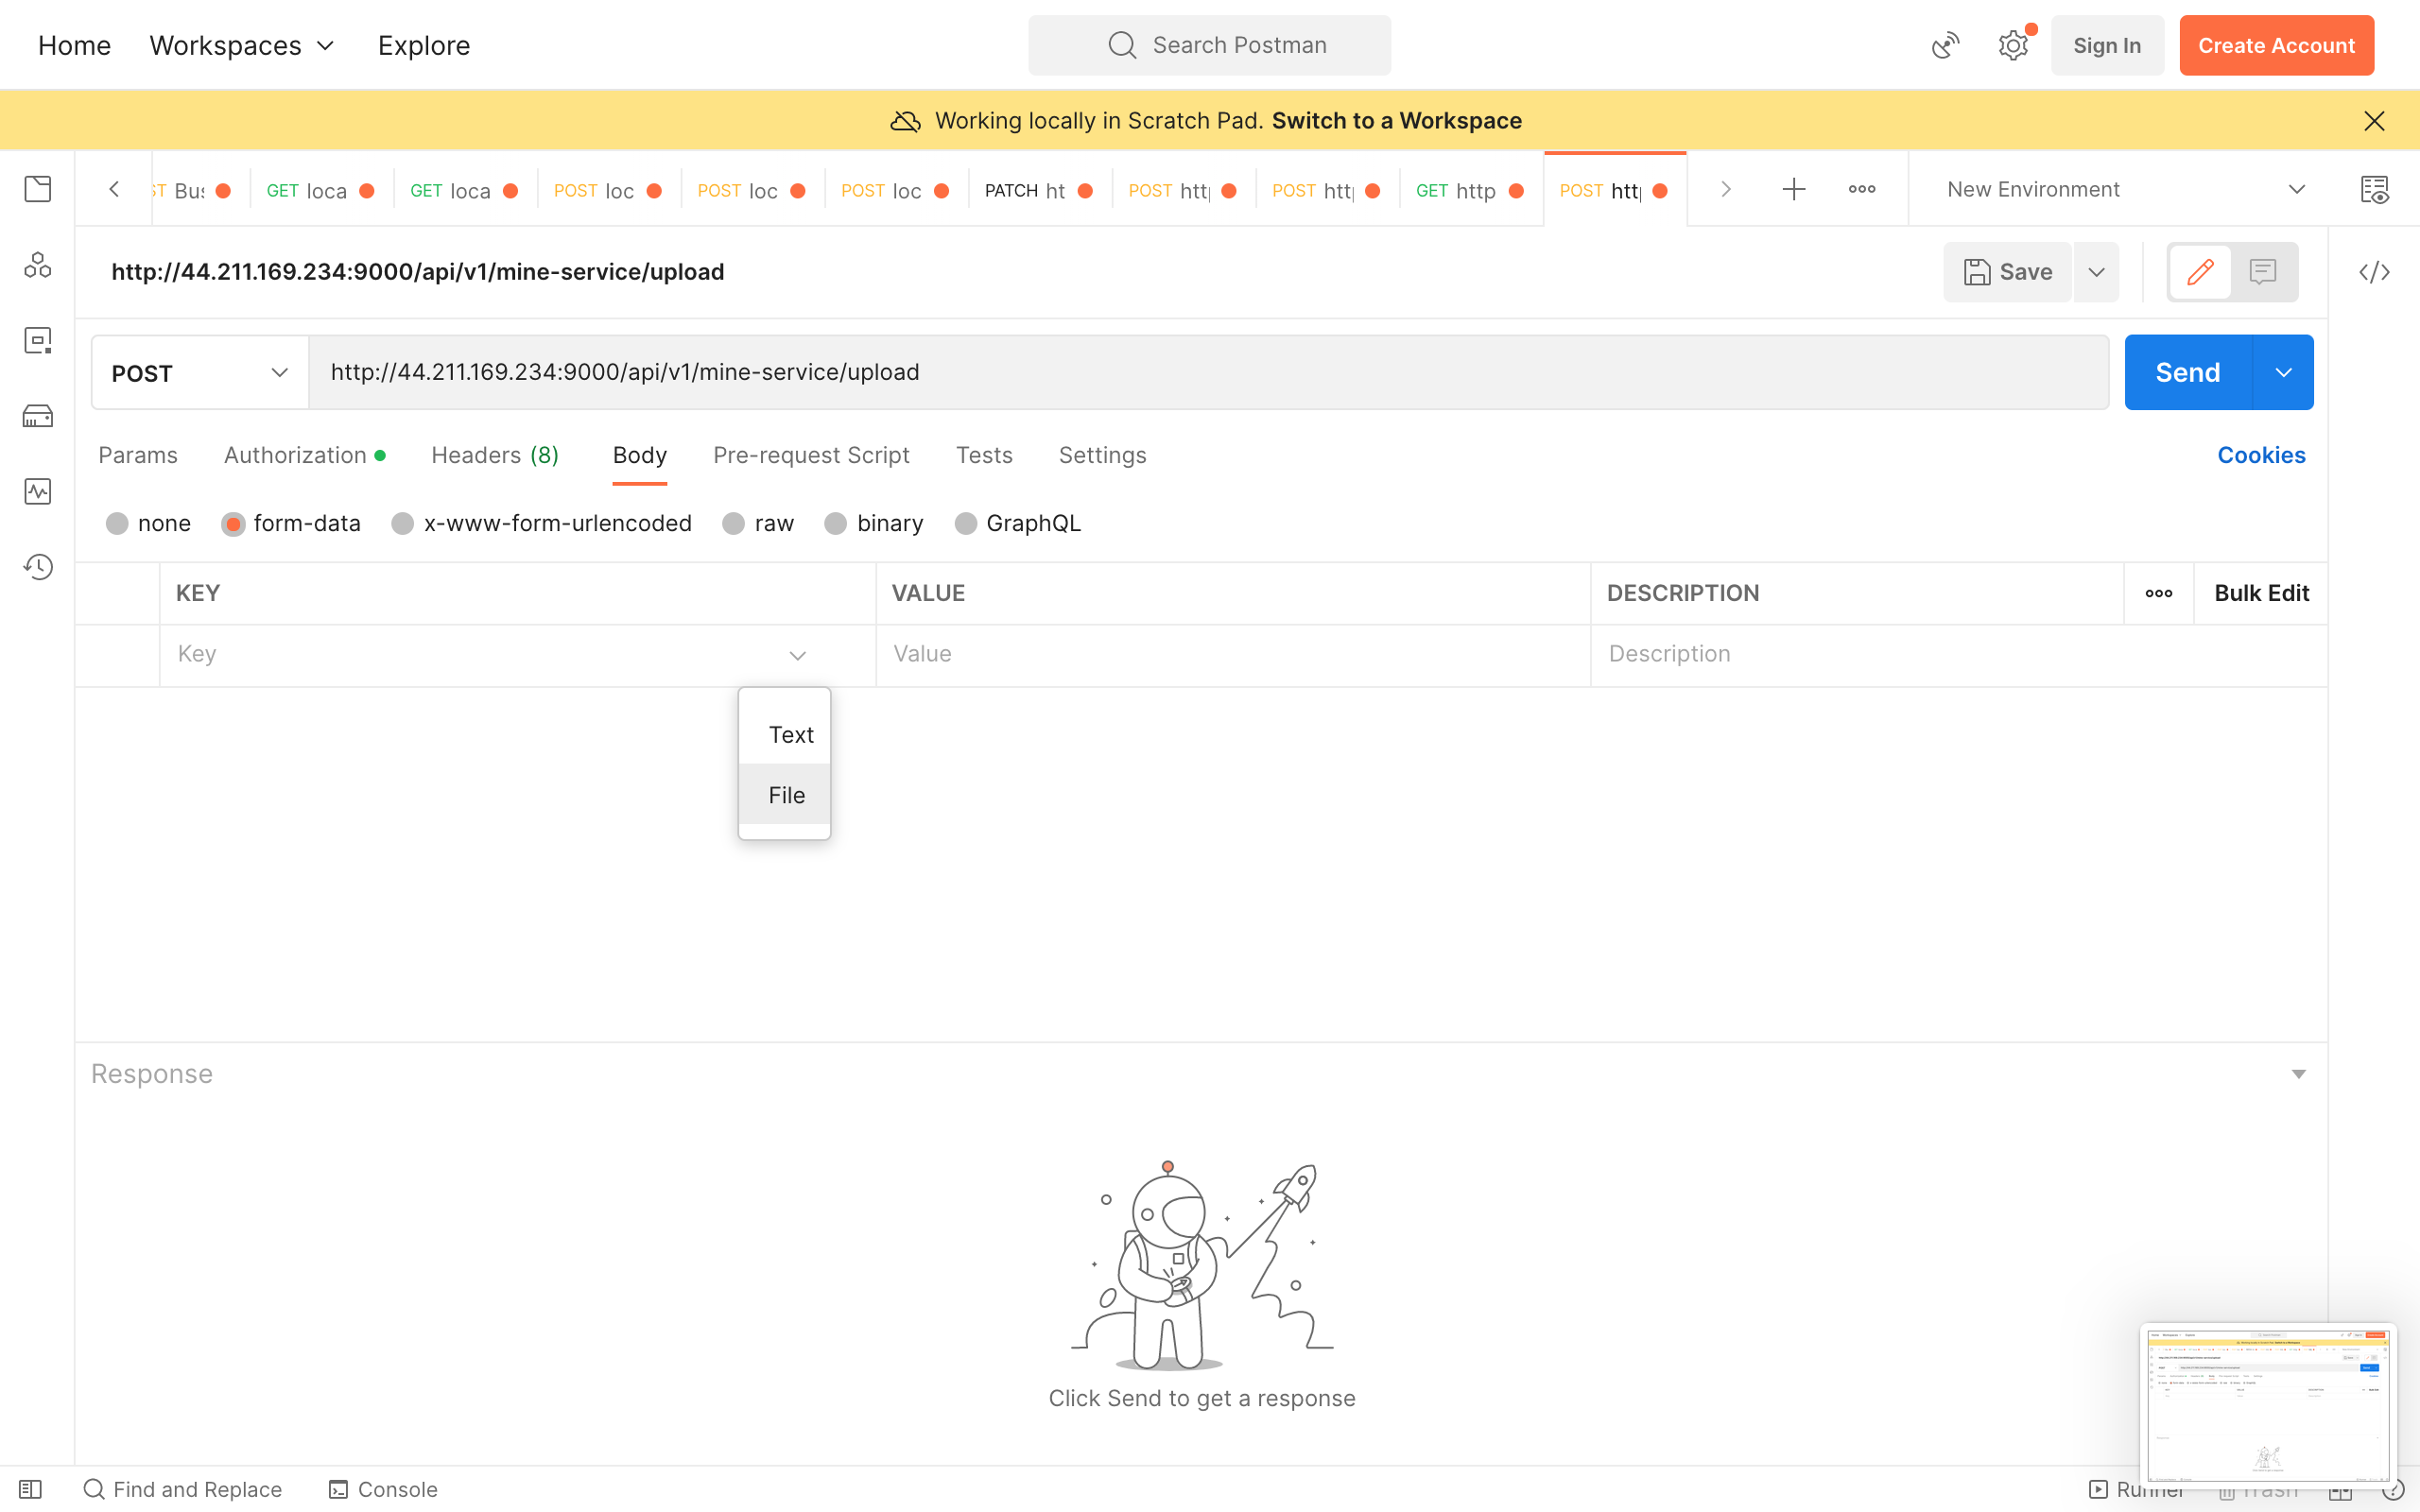
...and select the
fileoption the first rowSelect a file & enter the field name your API uses for the file field then hit send.
you should a response looking some like...
{
  "status": "success",
  "code": 201,
  "message": "mine image successful",
  "data": {
    "image_name": "elephants.jpg",
    "image_path": "https://mined-pictures.s3.amazonaws.com/981d53ac1d67416571d.png",
    "text_content": "A group of elephants eating grass",
    "date_created": "2022-11-23T17:20:51.002216449Z",
    "date_modified": "2022-11-23T17:20:51.002216449Z"
  }
}
The other way to test is to use Python. Prerequisites:
- You must have an account
- Python installation
- A computer with internet access
To get a JWT access token, you have to first make a login request with your signup credentials. to do this with python, copy and paste or type:
NOTE: make sure to run pip install requests first if you don't have it installed.
import requests

url = "https://discripto.hng.tech/api1/api/v1/login"

payload = "{\n\t\"email\": \"[email protected]\",\n\t\"password\": \"password\"\n}"
headers = {'Content-Type': 'application/json'}

response = requests.request("POST", url, data=payload, headers=headers)

print(response.text)
replace [email protected] with your email and password with your password.
sample response:
{
  "status": "success",
  "code": 200,
  "message": "User login successful",
  "data": {
    "Username": "johndoe",
    "FirstName": "John",
    "LastName": "Doe",
    "Email": "[email protected]",
    "Token": "eyJhbGciOiJIUzI1NiIsInR5cCI6IkpXVCJ9.eyJhdXRob3JpemVkIjp0cnVlLCJleHAiOjE2NjkyMjc2MDEsImlkIjoiT2JqZWN0SUQoXCI2MzdkMTdjOTQxMTg5ZmRjNmJiODkwZWVcIikifQ.sTzq6C2B86w94auIjqjSveJ55E6G8Iwa-E564gUdjrg",
    "TokenType": "bearer",
    "ApiCallCount": 8
  }
}
copy the "Token" value, that is the JWT access token we'll be using.
in a python file, copy and paste or type:
import requests

url = "https://discripto.hng.tech/api1/api/v1/mine-service/url"

payload = "{\n\t\"url\": \"image url here\"\n}"
headers = {
    'Content-Type': "application/json",
    'Authorization': "Bearer eyJhbGciOiJIUzI1NiIsInR5cCI6IkpXVCJ9.eyJhdXRob3JpemVkIjp0cnVlLCJleHAiOjE2NjkyNTEzNTUsImlkIjoiT2JqZWN0SUQoXCI2MzdkMTdjOTQxMTg5ZmRjNmJiODkwZWVcIikifQ.SyW5uq8pgwc2qlFY-PusHTL9HFYUDEoVKMvlTF57e0E"
    }

response = requests.request("POST", url, data=payload, headers=headers)

print(response.text)
Assuming the url provided links to the image below.
the sample response:{
"status": "success",
"code": 201,
"message": "mine image successful",
"data": {
"image_name": "elephants.png",
"image_path": "https://mined-pictures.s3.amazonaws.com/9d674181d53ac16571d.png",
"text_content": "A group of elephants eating grass",
"date_created": "2022-11-23T17:20:51.002216449Z",
"date_modified": "2022-11-23T17:20:51.002216449Z"
}
}To make the python request, copy and paste or type:
import requests

url = "https://discripto.hng.tech/api1/api/v1/mine-service/upload"

payload = "-----011000010111000001101001\r\nContent-Disposition: form-data; name=\"image\"\r\nvalue=elephants.jpg\r\n\r\n-----011000010111000001101001--\r\n"
headers = {
    'Content-Type': "multipart/form-data",
    'Authorization': "Bearer eyJhbGciOiJIUzI1NiIsInR5cCI6IkpXVCJ9.eyJhdXRob3JpemVkIjp0cnVlLCJleHAiOjE2NjkyMjc2MDEsImlkIjoiT2JqZWN0SUQoXCI2MzdkMTdjOTQxMTg5ZmRjNmJiODkwZWVcIikifQ.sTzq6C2B86w94auIjqjSveJ55E6G8Iwa-E564gUdjrg",
    'content-type': "multipart/form-data; boundary=---011000010111000001101001"
    }

response = requests.request("POST", url, data=payload, headers=headers)

print(response.text)
Assuming elephants.jpg is the same image as above,
the sample response:
{
  "status": "success",
  "code": 201,
  "message": "mine image successful",
  "data": {
    "image_name": "elephants.jpg",
    "image_path": "https://mined-pictures.s3.amazonaws.com/981d53ac1d67416571d.png",
    "text_content": "A group of elephants eating grass",
    "date_created": "2022-11-23T17:20:51.002216449Z",
    "date_modified": "2022-11-23T17:20:51.002216449Z"
  }
}- axios
- Some knowledge of html and Javascript.
In your index.html file copy the following code
<div className="App">
  <h1>Hello Discripto</h1>

  <h2>Start mining to get some context</h2>

  <input type="file" name="file" onChange="function(e){handleFile(e)}" />

  <button onClick="function(e){handleUpload(e)}">Upload</button>
</div>
then in the corresponding main.js file configure the following code snippet to suit your frontend/framework.
import  axios  from  "axios";

let file;
handleFile(e) {

    file = e.target.files[0];
}

async  handleUpload(e) {

    console.log(file);

    await  uploadImage(file);

}


const  uploadImage  =  async  file  =>  {

    try  {

        console.log("Upload Image",  file);

        const  formData  =  new  FormData();

        formData.append("image",  file);


        const  config  =  {

            headers:  {
                "content-type":  "multipart/form-data"
                "authorisation": `Bearer ${your_bearer_token_here}`
            }

        };

        const  API  =  "api/v1/mine_service/upload";

        const  HOST  =  "http://44.211.169.234:9000";

        const  url  =  `${HOST}/${API}`;


        const  result  =  await  axios.post(url,  formData,  config);

        console.log("Result: ",  result);

    }  catch  (error)  {
        console.error(error);
    }

};Discripto provides a nice GUI to implement all of these. Head over there for a demo
Our website link: https://minergram.netlify.app Our API link: https://discripto.hng.tech/api1/
At this stage our app has basically the same functionality. But this time We are focusing on commercializing the app. Here we have new features
- User should be able upload images in batches while the system sorts the images based on tags provided by the User.
- User can input the image through various formats and receive output through preferred formats.
- A public API Documentation is provided for use by third party consumers.
- A friendly payment system integration.
Mine Images through csv files: A csv file as the implies means "Comma separated Values" a file that separates data with commas. Images can also be mined through various processes like images upload etc following a similar process.
I will be Showing steps of mining Image Using the website
- Signup on The website as already stated above
- Login to get your access Jwt access token. This enables the users Using both the Public ApI and Website to have access to our ApI calling
- Get your list of Urls ready in a CSV files or Json format
- Fill in the required details which includes the tags for the sorting process
- Upload the CSV file to our website
- A batch process kicks off which returns you a sorted CSV file
- After the processing you will get feedback via email
Bearer:"eyJhbGciOiJIUzI1NiIsInR5cCI6IkpXVCJ9.eyJhdXRob3JpemVkIjp0cnVlLCJleHAiOjE2NjkyMjc2MDEsImlkIjoiT2JqZWN0SUQoXCI2MzdkMTdjOTQxMTg5ZmRjNmJiODkwZWVcIikifQ.sTzq6C2B86w94auIjqjSveJ55E6G8Iwa-E564gUdjrg"
Request Url:
https://discripto.hng.tech/api1/
curl --request POST \
  --url https://discripto.hng.tech/api1/ \
  --header 'Content-Type: application/json' \
  --data '{
	"name": string,
	"description": string,
	"tags": [] lists of tags,
	"images" : string(list of Urls)
}'
Request format:

{
  "user_id":"<ObjectID>",
  "_id":"<ObjectID>",
  "name": "string",
  "description":"string"
  "tags":["string","string"]
  "status":"string"
}
Response format:

{
  "_id":"<ObjectID>",
  "name": "string",
  "description":"string"
  "tags":[] list of strings
  "status":"string"
  "message":"string"
}
Bearer: "eyJhbGciOiJIUzI1NiIsInR5cCI6IkpXVCJ9.eyJhdXRob3JpemVkIjp0cnVlLCJleHAiOjE2NjkyMjc2MDEsImlkIjoiT2JqZWN0SUQoXCI2MzdkMTdjOTQxMTg5ZmRjNmJiODkwZWVcIikifQ.sTzq6C2B86w94auIjqjSveJ55E6G8Iwa-E564gUdjrg"
Request Url:
https://discripto.hng.tech/api1/
""tags":[] list of strings" The response Tag for the sorted Url is represented in this format

[
 {  "tag": "tag-1",
    "data": [
       {"url": "image url"},
       {"url": "image url"},
       {"url": "image url"}
    ]
 },
 {
    "tag": "tag-2",
    "data": [
       {"url": "image url"},
       {"url": "image url"},
       {"url": "image url"}
    ]
 },
 {
    "tag": "untagged",
    "data": [
       {"url": "image url"},
       {"url": "image url"},
       {"url": "image url"}
    ]
 }
]

